How to Apply for WhatsApp Business API

Last Updated: 24 January 2026 5 min read
1

Connect Your Facebook Business Manager

Step 1: Connect Your Facebook Business Manager

To begin, open your Chat Mitra dashboard and click "Connect FB Manager".

A popup will open asking you to log in to Facebook. Ensure you are using the correct Facebook Business account, as this gives Chat Mitra permission to manage your WhatsApp Business API connection.

2

Login and Authorize Facebook

Step 2: Login and Authorize Facebook

Enter your Facebook password to verify your identity, then confirm your account details and click Continue to proceed.

3

Confirm Account and Permissions

Step 3: Confirm Account and Permissions

Review the permissions that Chat Mitra is requesting. Check that the account name is correct, then click Continue to move forward.

4

Select Business Assets

Step 4: Select Business Assets
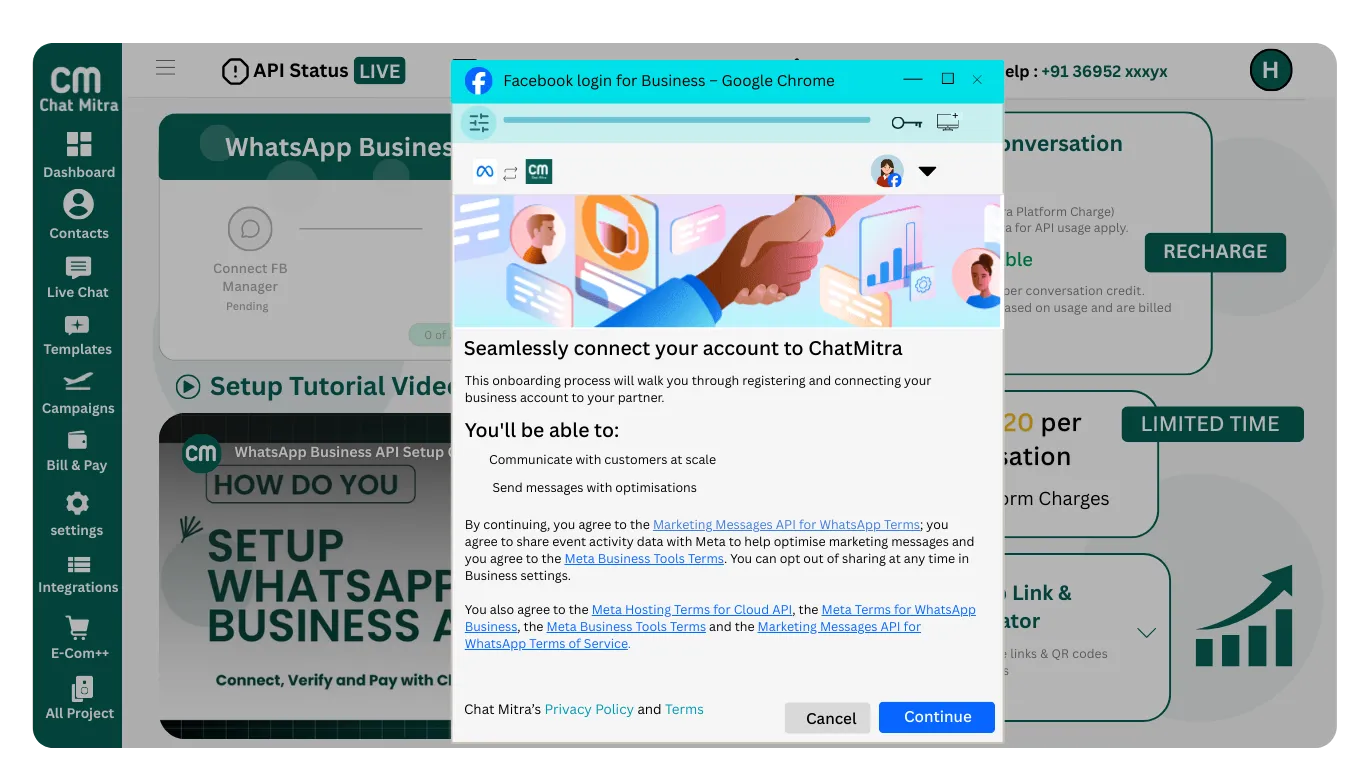
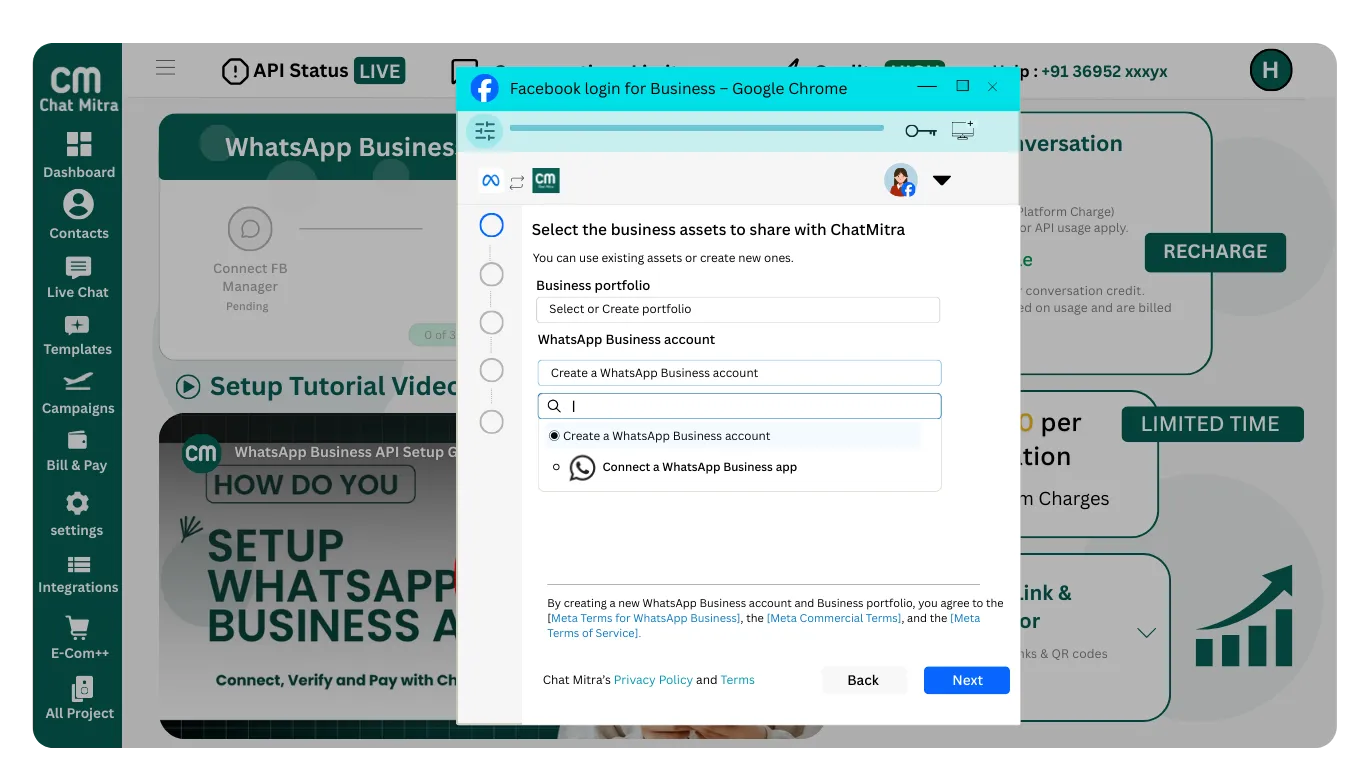
Important: Your selections here determine which screens appear next. If you already have business assets, select them. Otherwise, create them now.

Business Portfolio

You must either select an existing Business Portfolio or create a new one.

Already have one? Select it from the dropdown.

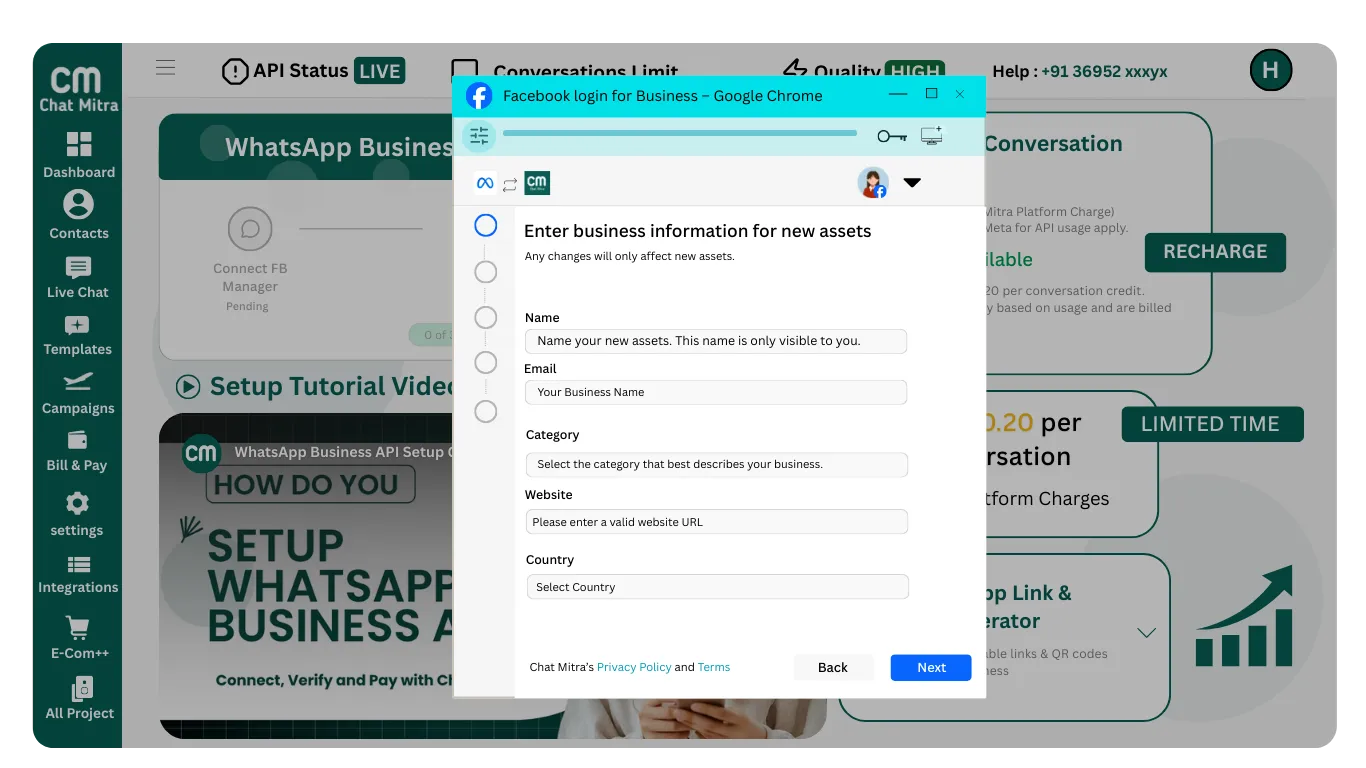
Creating for the first time? Click "Create Business Portfolio" and fill in:

  • Business Name
  • Email Address
  • Business Category
  • Country
  • Website Or Social Media Page Url (Example:FB/Instagram Page Urls)
  • Time Zone

After filling the form, click Next.

WhatsApp Business Account

Now choose how you want to connect WhatsApp. You have three options:

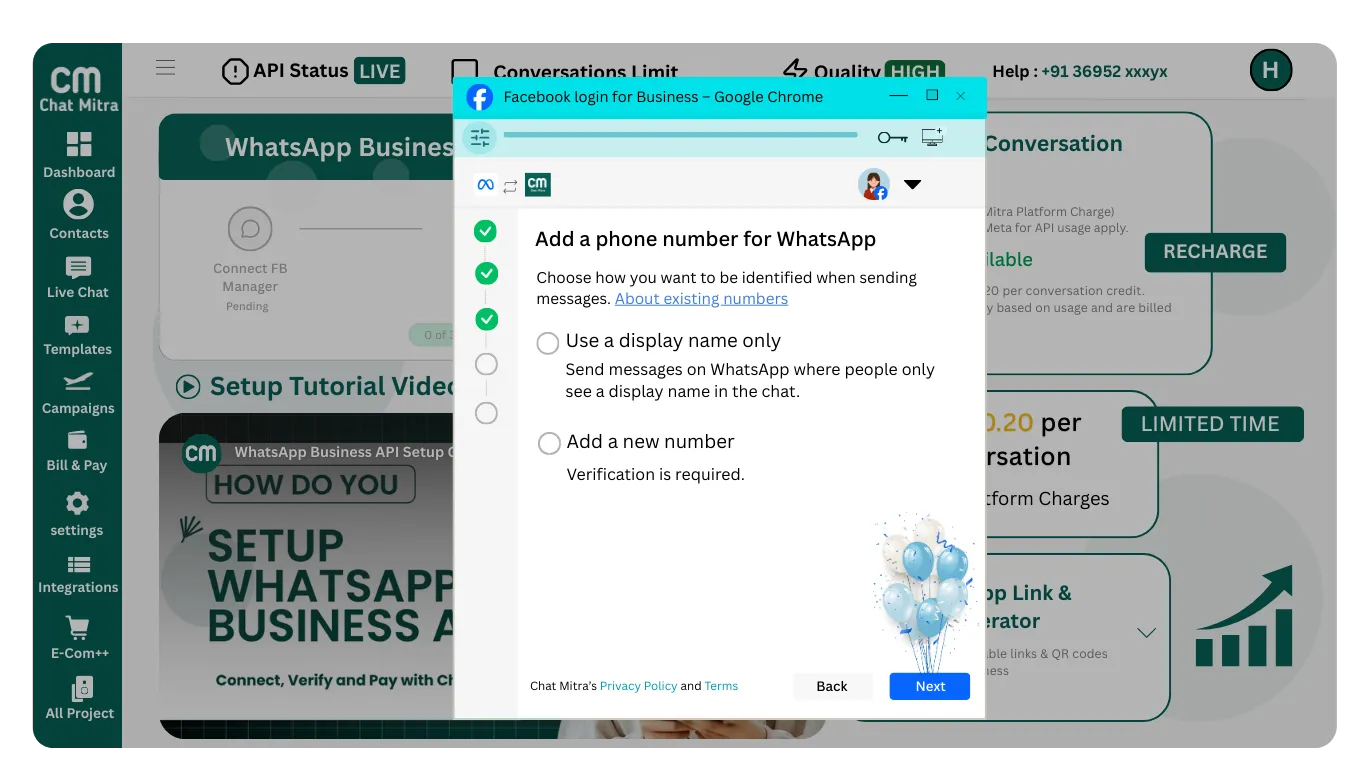
Option A: Create WhatsApp Business Account

Choose this if you are new to the WhatsApp Business API.

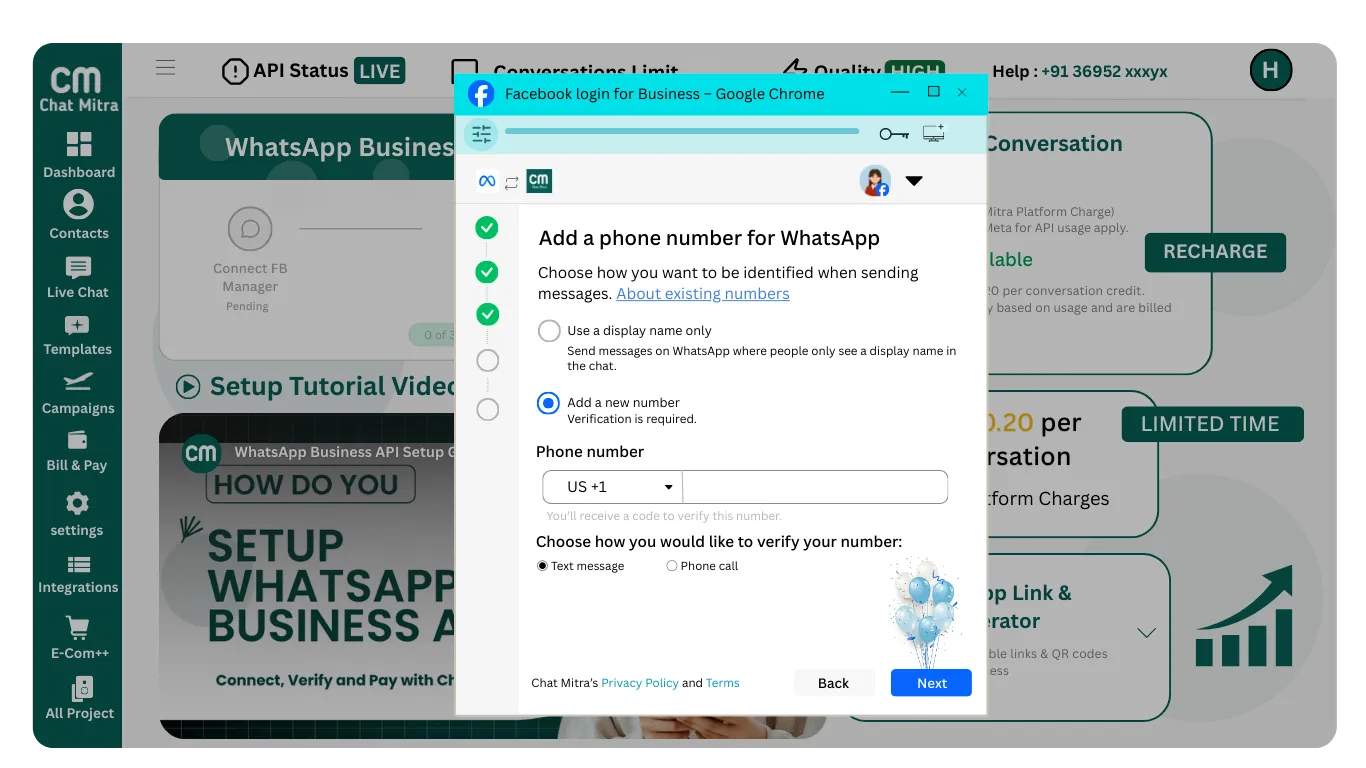
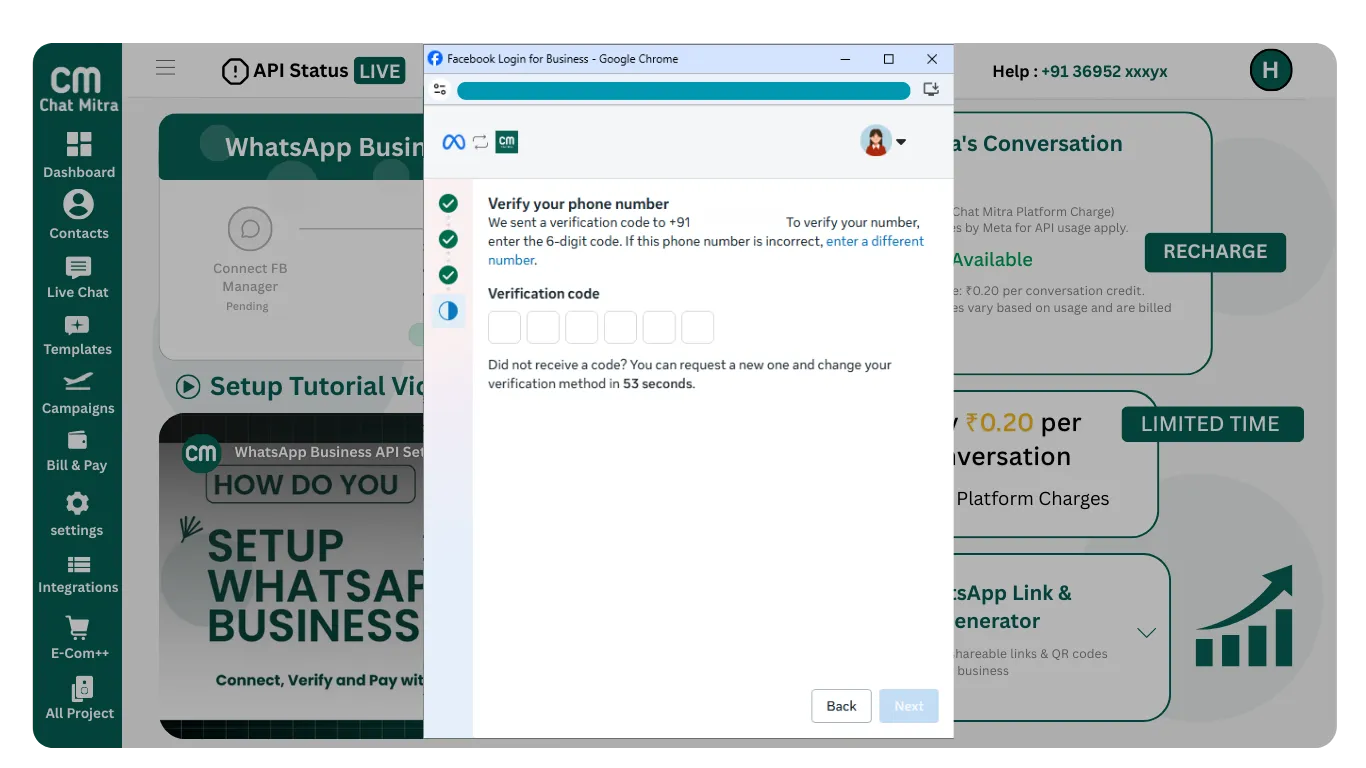
Next: You will add your WhatsApp phone number and choose between using a display name only or adding a new number with verification.

Option B: Select Existing WhatsApp Business API

If you already have a WhatsApp Business API account, simply select it from the dropdown and continue.

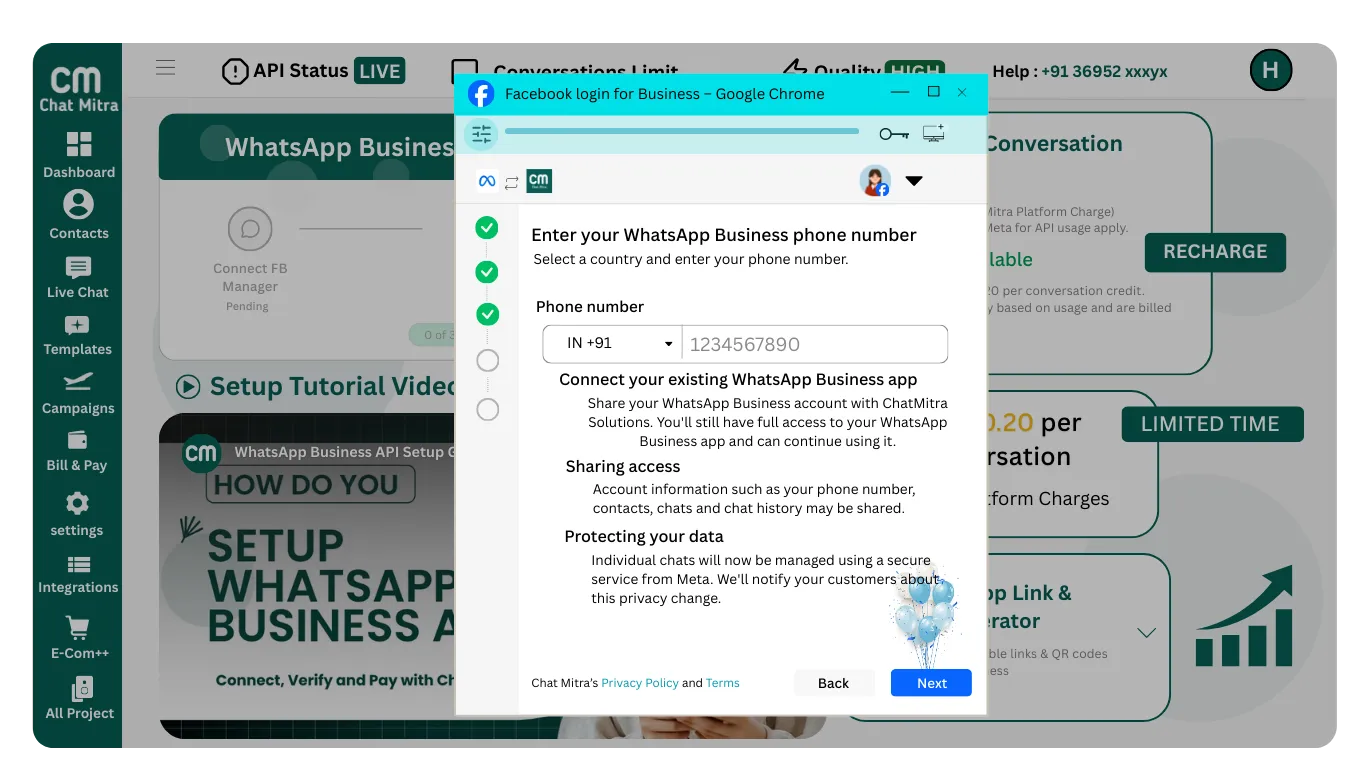
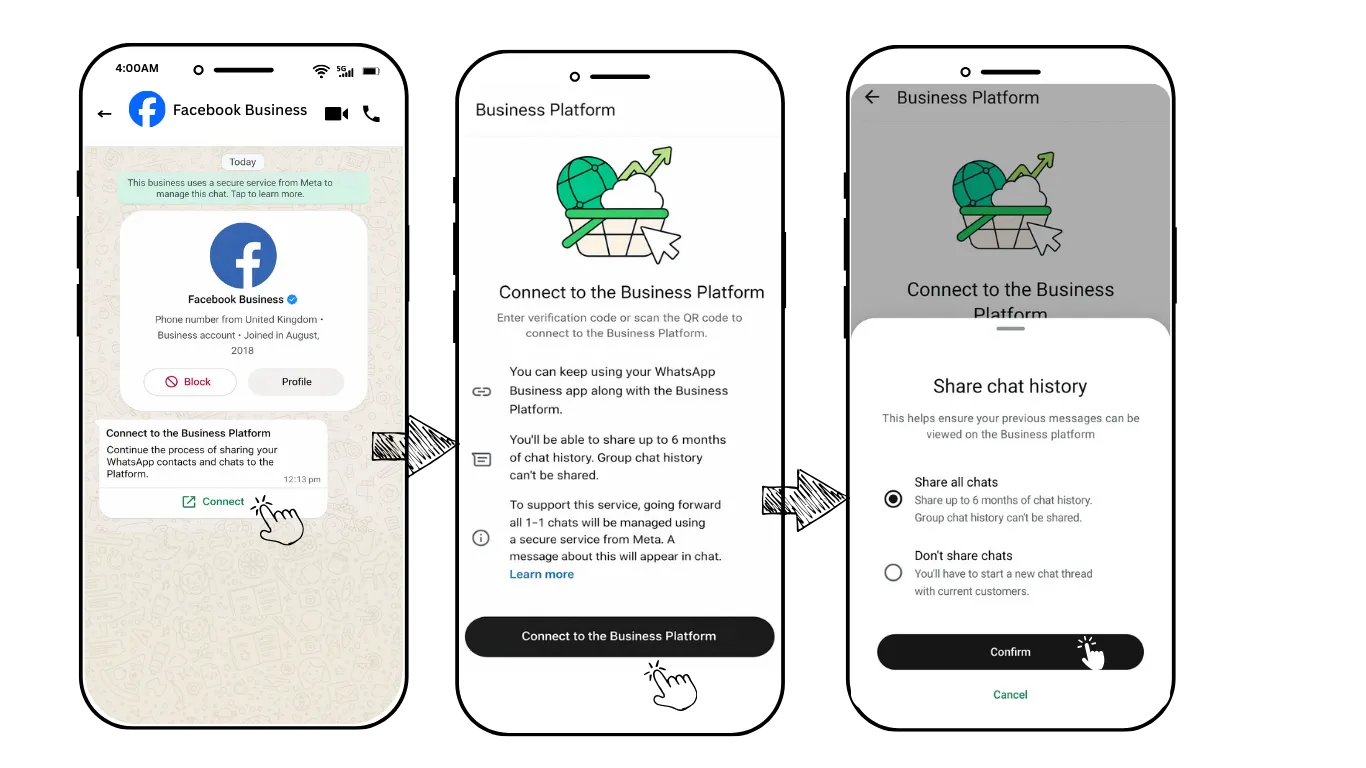
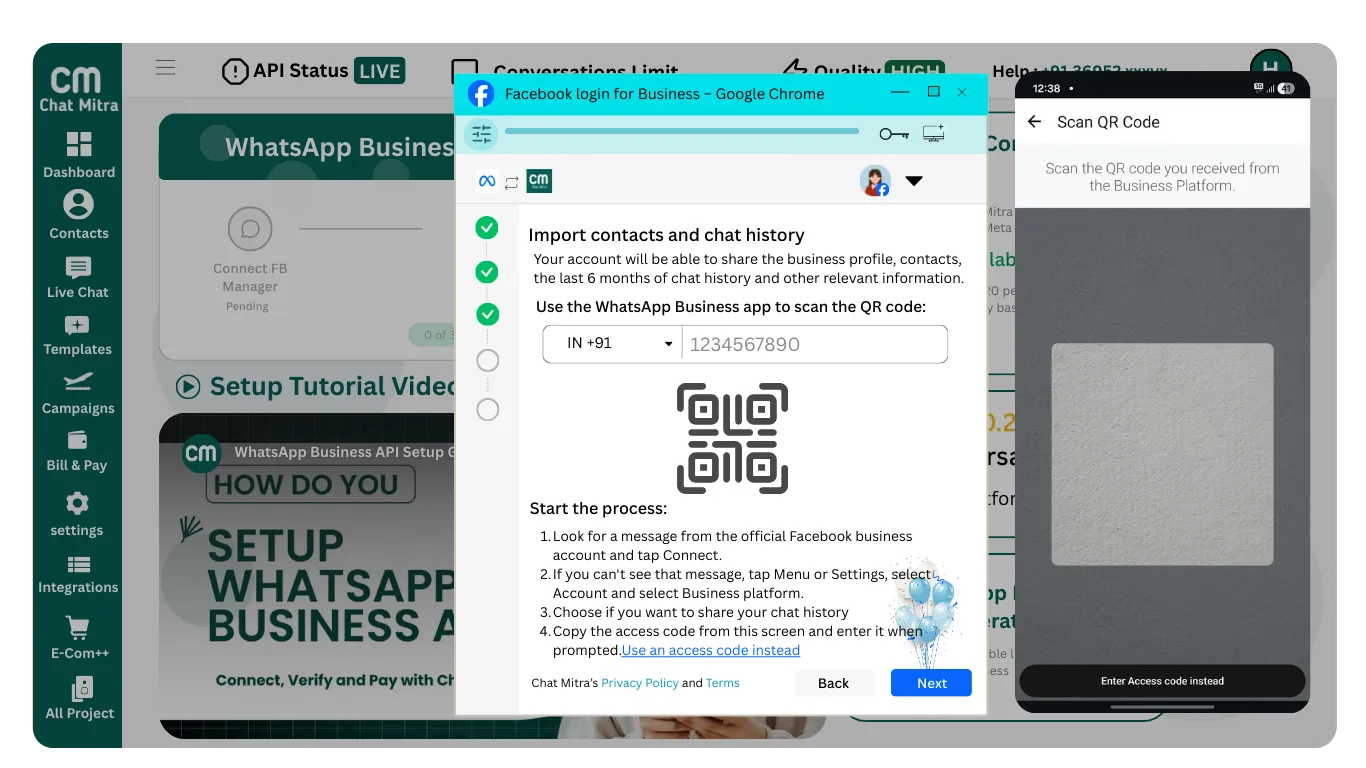
Option C: Connect WhatsApp Business App

Choose this if you are already using the WhatsApp Business mobile app.

Next: Enter your existing WhatsApp Business phone number and scan a QR code to connect.

Catalog

In this step, you must create or select a Catalog to continue. The Catalog allows you to showcase your products or services inside WhatsApp. If you don’t have one, create a new Catalog and proceed to the next step.

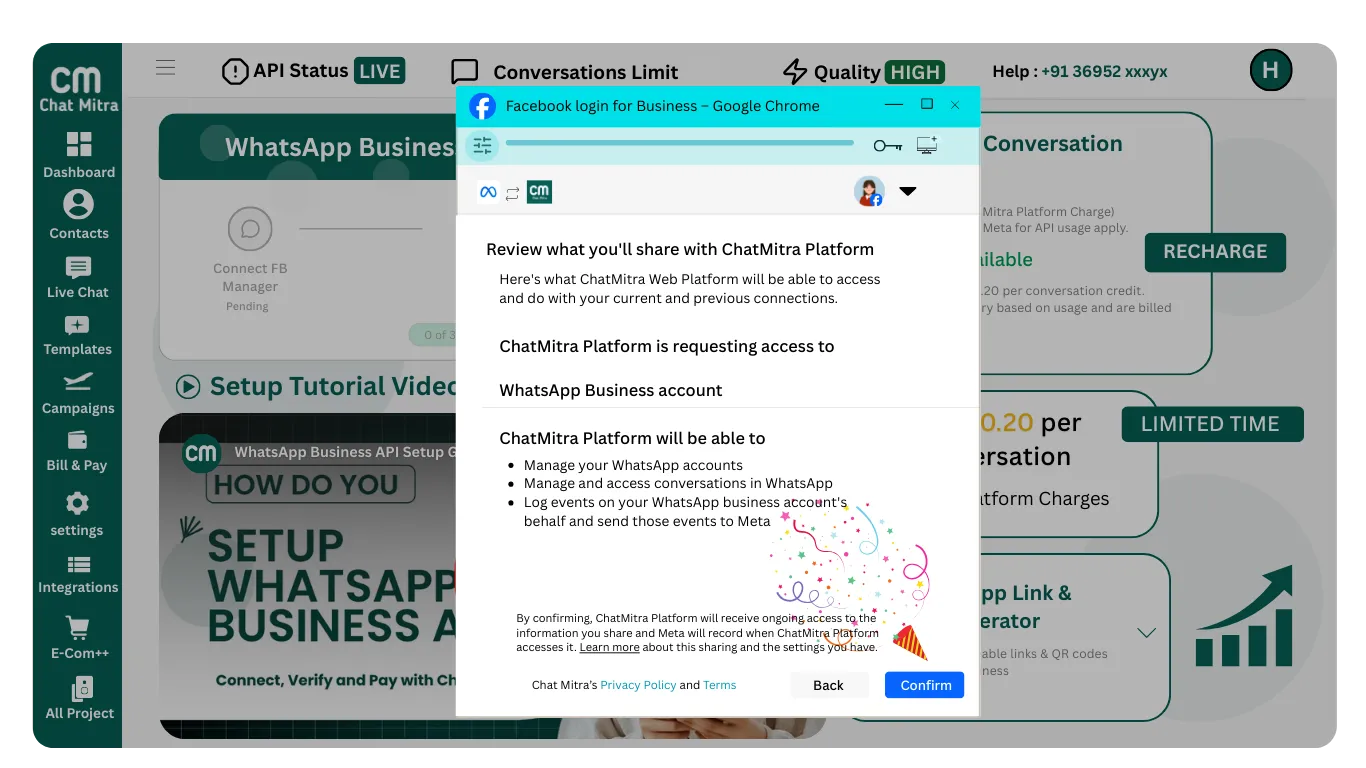
After selecting the correct options in all sections, click Next to continue.

5

Enter Business Information for New Assets

Step 5: Enter Business Information for New Assets

If you are creating new assets, a form will appear. Fill in these details:

  • Business Name
  • Email Address
  • Business Category
  • Country
  • Website Or Social Media Page Url (Example:FB/Instagram Page Urls)
  • Time Zone

After completing the form, click Next.

6

Add Your WhatsApp Phone Number (Option A: Create New Account)

Step 6: Add Your WhatsApp Phone Number (Option A: Create New Account)
You selected: Create WhatsApp Business Account. Now you must add your WhatsApp phone number.

You have two setup options:

Option 1: Use Display Name Only

Customers will see only your business display name in chat. Your actual phone number will not be publicly visible.

Meta provides a virtual phone number starting with +1 for messaging via the API. This is commonly used for businesses implementing WhatsApp API for automation and chatbot workflows.

Use Display Name Only setup screen
Option 2: Add a New Number (Verification Required)

Register a new phone number for your WhatsApp Business account. You will need to verify it using an OTP sent via SMS or phone call.

  • Enter your phone number
  • Select your country code
  • Click Next to proceed with verification
Add new WhatsApp number screen
OTP Verification

After entering your number, verify it using a One-Time Password (OTP).

  • Choose verification method: SMS or Phone Call
  • Enter the OTP you receive
  • Click Verify to complete setup
OTP verification screen
7

Connect Your WhatsApp Business App (Option C: Mobile App Users)

Step 7: Connect Your WhatsApp Business App (Option C: Mobile App Users)
You selected: Connect WhatsApp Business App. This method connects your existing WhatsApp Business mobile app to Chat Mitra.

Step 1: Enter Your WhatsApp Business Phone Number

Select your country code and enter the same phone number you use in your WhatsApp Business mobile app.

  • Choose correct country code (e.g., +91, +1, etc.)
  • Enter your active WhatsApp Business number
  • Click Next
Enter WhatsApp Business phone number screen

Step 2: QR Code Appears on Your Desktop

After clicking Next, a QR code will appear on your screen. Now open your WhatsApp Business app on your mobile phone.

Step 3: Connect on Your Mobile Phone

On your mobile phone, follow these steps:

  • Open WhatsApp Business App
  • Go to Settings
  • Tap Account
  • Select Business Platform
  • Tap Connect to the Business Platform
Mobile phone connection steps

Step 4: Share Chat History Option

WhatsApp will ask whether you want to share your chat history.

  • Choose Share all chats (recommended)
  • Or choose Don't share chats
  • Tap Confirm

Step 5: Scan the QR Code

Your phone camera will open automatically after confirming. Point it at the QR code displayed on your desktop screen.

Scan QR code step
Final Step: Review and Confirm

After scanning the QR code successfully, a confirmation screen will appear showing what data you are sharing with Chat Mitra.

Review the details and click Confirm to complete the connection.

Review data sharing screen
8

Finish Setup

Step 8: Finish Setup

You have successfully configured your WhatsApp Business API connection. Click Finish to activate your API and begin using Chat Mitra.

Your account is now ready to start sending messages to customers on WhatsApp.

Next Step is verify Facebook Meta Business Manager

Now you need to verify your Facebook Meta Business Manager to activate your WhatsApp Business API completely. Make sure your business details match your government registration documents. During verification, choose the option that already shows your registered mobile number or email ID so the verification process becomes faster and smoother.

Next: Verify Your Meta Business Account with Chat Mitra in 2026

Frequently Asked Questions

What is the WhatsApp Business API, and how does Chat Mitra help?

The WhatsApp Business API allows businesses to automate and manage customer communications on WhatsApp at scale. Chat Mitra simplifies the setup by providing a step-by-step guide to connect your Facebook Business Manager, create or link a WhatsApp Business profile, and start messaging customers seamlessly without technical complexity.

Who can apply for the WhatsApp Business API?

Any registered business with a Facebook Business Manager account can apply. Chat Mitra supports businesses of all sizes, from startups to enterprises, to set up and use the WhatsApp Business API effectively.

How much does it cost to use the WhatsApp Business API with Chat Mitra?

Chat Mitra charges an additional fee of 0.20 per conversation on top of Meta's base rates (for example, marketing conversations start at 0.78). There are no setup fees. Refer to the pricing section on chatmitra.com for the most current rates and plan details.

Do I need a Facebook Business Manager account?

Yes. A Facebook Business Manager account is required to apply for the WhatsApp Business API. It is used to verify your business identity and manage your WhatsApp account through Chat Mitra.

Can I use an existing WhatsApp number?

You can use an existing number if it is not currently active on any WhatsApp platform. Alternatively, Chat Mitra allows you to use a virtual number provided by Meta for sending messages through the API, which supports messaging but not voice calls.

How long does WhatsApp Business API approval take?

Meta typically completes commerce and business verification within 24 hours if there are no issues with your application. Display name review may take additional time. You will receive notifications at each stage of the approval process.

What if my application is rejected?

If your application is rejected, Meta provides a reason in the notification (such as policy violation or incomplete information). You can update your business details in Chat Mitra and resubmit your application for review.

Is OTP verification required?

OTP verification is required only if you choose to add and verify a new phone number during setup. If you select the display name option or connect an existing WhatsApp Business app, OTP verification is not needed.

Can I use WhatsApp Business API for customer support?

Yes. The WhatsApp Business API is ideal for customer support. With Chat Mitra, you can automate support responses, send order updates, integrate a chatbot to handle inquiries 24/7, and provide a seamless customer experience on WhatsApp.

How do I start messaging customers after setup?

Once your API is active, Chat Mitra allows you to create message templates, import contacts, and send campaigns. Your API status will show as LIVE, and you can begin messaging within your allocated conversation limits.