API Authentication Methods Explained: API Keys, Bearer Tokens, Basic Auth and OAuth


Quick Summary
The four API authentication methods you'll meet most are API keys, bearer tokens, basic auth and OAuth 2.0. An API key is a long-lived secret that identifies your account, usually sent in a header. A bearer token is sent as Authorization: Bearer and works for whoever holds it. Basic auth sends a username and password (or key and secret), Base64-encoded, in the Authorization header. OAuth 2.0 issues short-lived access tokens after an app is approved for specific permissions. In a no-code workflow, the API's documentation tells you which method to choose; WorkflowMitra, powered by ChatMitra, offers the first three in its HTTP Request step and handles OAuth through app connections.
Every API asks the same question before it does anything: who are you, and are you allowed to do this? The answer goes in the request as a credential. Get it wrong and the API replies with a 401 or a 403, and a workflow that looked finished stops working.
The trouble for non-developers is that API documentation rarely explains its choice. One page says “pass your key in the X-API-Key header”, another says “use HTTP Basic with your API key as the username”, a third says “obtain an access token using the client credentials grant”. They’re all describing a handful of methods, and once you can recognise those, almost every authentication section becomes a fill-in-the-blanks exercise.
This guide explains the API authentication methods you’ll actually meet, what each one is good and bad at, how to tell which one an API wants, and how to set each up in a workflow without leaking the secret. The examples use the HTTP Request step in WorkflowMitra, powered by ChatMitra, and every pattern shown was sent through its request code against public test services before publication. The concepts apply to any automation tool.
What is API authentication?
API authentication is how an API checks who is making a request. The caller attaches a credential, such as an API key, a token, or a username and password, usually in a request header. The API verifies it and then decides what that caller may do. The four common methods are API keys, bearer tokens, basic authentication and OAuth 2.0. The API's documentation tells you which one it accepts; you don't get to choose.
Two words get mixed up here, and the difference explains most errors:
- Authentication answers who are you? Fail it and you get 401 Unauthorized (the name is historical; it really means “unauthenticated”).
- Authorisation answers what may you do? Pass authentication but lack permission and you get 403 Forbidden.
So a 401 means “check the credential”, and a 403 means “the credential works, but it isn’t allowed to do this”. Keep that in mind; it comes back in the troubleshooting section.
The four main API authentication methods at a glance

| Method | What you send | Typical lifetime | Who it represents | Where you'll see it |
|---|---|---|---|---|
| API key | A secret string in a header the API names, such as X-API-Key (sometimes a query parameter) | Until you revoke it | An account, project or app | Data, email, SMS and developer-focused APIs |
| Bearer token | Authorization: Bearer <token> | Minutes to forever, depending on the issuer | Whoever holds it | Personal access tokens, OAuth access tokens, most modern APIs |
| Basic auth | Authorization: Basic + Base64 of username:password | As long as the password or key | A user, or a key and secret pair | Older APIs, helpdesks, ecommerce platforms, payment gateways |
| OAuth 2.0 | A short-lived access token (sent as a bearer token), obtained first from a token endpoint | Often about an hour, renewed with a refresh token | A user's approved permissions, or an app | Google, Microsoft, Zoho, social networks, large SaaS |
Notice that OAuth isn’t really a fourth way of sending a credential. It’s a way of getting one. The token it produces travels as a bearer token. That’s why the setup in most tools has three static options plus a separate route for OAuth.
API keys
An API key is a long random string the service generates for you, usually from a page called API, Developer, or Integrations in its settings. You attach it to every request, and the service looks it up to find your account, apply your plan’s limits and log your usage.
Where it goes depends entirely on the API:
- A custom header is the most common choice. The documentation names it:
X-API-Key,api-key,x-api-tokenand so on. Pipedrive, for example, accepts anx-api-tokenheader. - The
Authorizationheader with a word in front, such asAuthorization: Token abc123orAuthorization: Bearer abc123. - A query parameter on the URL, such as
?api_key=abc123. Some older or public-data APIs only accept this.
API keys are popular because they’re easy: create one, paste it, done. Their weaknesses come from the same simplicity. A key usually doesn’t expire, so a leaked key keeps working until someone notices and revokes it. Many services give a key the full power of the account, with no way to narrow it. And a key identifies an application or account, not a person, which is why the OWASP API Security Top 10 says API keys should be used for API client authentication, not user authentication.
When the API gives you a choice of placement, prefer a header. URLs end up in server logs, browser history, proxy logs and error reports. Headers are far less likely to be written down.
Bearer tokens
A bearer token is defined by how it’s used, not by what it looks like. The OAuth bearer token standard, RFC 6750, describes it as a token that any party in possession of it can use, just like any other party holding it. No password, no signature, no proof of identity beyond having the string. Whoever bears it gets in.
You send it in one place:
Authorization: Bearer eyJhbGciOiJSUzI1NiIs...Bearer tokens come from two very different sources, and it helps to know which you have:
- Personal access tokens. You create them in an app’s settings, often choosing permissions and an expiry date. Airtable, GitHub and many modern SaaS tools work this way. Functionally they’re API keys that happen to travel as bearer tokens.
- OAuth access tokens. A token endpoint issues them after an OAuth exchange, and they usually expire quickly. The token we received from a public OAuth demo server while testing for this article was valid for exactly 3,600 seconds.
Many access tokens are JWTs (JSON Web Tokens): three Base64URL sections separated by dots, the middle one holding readable claims such as the expiry time (exp) and permissions (scope). That makes them handy for debugging, but treat a production token like a password. Don’t paste it into a public online decoder.
API key vs bearer token: what’s the real difference?
This is the comparison people search for most, and the honest answer is that the two overlap:
| API key | Bearer token | |
|---|---|---|
| What the term describes | A kind of credential: a static secret tied to an account | A way of presenting a credential: whoever holds it may use it |
| Where it's sent | Any header or parameter the API chooses | Always Authorization: Bearer … |
| Lifetime | Usually until revoked | Often short (OAuth), sometimes long (personal tokens) |
| Scope | Often the whole account | Often limited to approved scopes |
| Can it be both? | Yes. When docs say "send your API key as a bearer token", the key is the bearer token. Pick Bearer token in the step and paste the key. | |
In practice, follow the documentation’s exact wording. If it shows Authorization: Bearer, choose the bearer option. If it shows any other header name, choose the API key option and type that name.
Basic authentication
HTTP Basic authentication is the oldest method still in wide use, defined today in RFC 7617. The client joins a username and password with a colon, Base64-encodes the result and sends it:
Authorization: Basic YXNoYTpzM2NyZXQ=That string decodes straight back to asha:s3cret. Base64 is encoding, not encryption. RFC 7617 is blunt about it: Basic isn’t considered a secure way to authenticate users unless it runs over something like TLS, because otherwise the password crosses the network in cleartext. Over HTTPS, the whole request is encrypted in transit, and Basic auth is perfectly serviceable for server-to-server calls.
What makes Basic confusing is that many APIs reuse it for things that aren’t a username and password:
| API | "Username" | "Password" |
|---|---|---|
| Freshdesk | Your API key | Any placeholder, conventionally X |
| Zendesk (API token) | Your email followed by /token | The API token |
| WooCommerce REST API | Consumer key | Consumer secret |
| OAuth token endpoints | Client ID | Client secret |
When a docs page shows curl -u something:something, that’s Basic auth, and the part before the colon is the username field.
Basic auth is fading for user passwords. Freshdesk no longer accepts username-and-password authentication on its API, and Zendesk’s own security page now labels API tokens as deprecated and points developers to OAuth access tokens. As a rule, if an API offers you a choice between your login password and a key, always use the key.
OAuth 2.0
OAuth 2.0 (RFC 6749) solves a problem the other methods can’t: letting one app act on your account in another app without ever seeing your password, and only with the permissions you approve. Think of the sign-in screens that say “WorkflowMitra wants to view and manage your spreadsheets. Allow?” That approval is OAuth.
The result of any OAuth flow is an access token, which you then send as a bearer token. What differs between flows is how you get it. These flows are called grant types:
| Grant type | Who approves | Typical use | No-code fit |
|---|---|---|---|
| Authorization code (with PKCE) | A person, in a browser sign-in screen | Acting on a user's Google, Microsoft or Zoho account | Best handled by a built-in app connection |
| Client credentials | Nobody: the app proves itself with a client ID and secret | Machine-to-machine APIs, internal services | Doable with two HTTP steps |
| Refresh token | Nobody, after a one-time approval | Renewing an expired access token | Handled by connections; manual use has limits |
| Device authorization | A person, on a second device | TVs, command-line tools | Rarely relevant |
| Implicit, password (legacy) | — | Older integrations | Avoid: deprecated by current security guidance |
The last row matters if you’re following an old tutorial. RFC 9700, the OAuth 2.0 Security Best Current Practice published in January 2025, says the resource owner password credentials grant must not be used and clients should not use the implicit grant. It also says access tokens must not be passed in a URL query parameter. OAuth 2.1, which folds these rules into one specification, was still an IETF Internet-Draft when we checked in October 2026, so you’ll keep seeing “OAuth 2.0” in documentation for a while.
Two more OAuth words you’ll see:
- Scopes are the permissions a token carries, such as
ZohoCRM.modules.leads.READ. A token with the wrong scope gets a 403, not a 401. - Refresh tokens are longer-lived credentials used only to get new access tokens. Zoho’s documentation, for example, says its access tokens last an hour and its refresh tokens don’t expire, but that you can mint at most ten access tokens from one refresh token in ten minutes.
Basic auth vs OAuth
The usual question “basic auth vs OAuth” compares two different things. Basic auth is a credential, sent on every request. OAuth is a process for issuing temporary, scoped credentials. OAuth is the better design when someone else’s account is involved, because the password never leaves the provider and access can be revoked per app. Basic auth (with a key, over HTTPS) is fine when you’re calling your own account from your own workflow. Again, the API decides; you configure what it asks for.
Other methods you may run into
A few APIs use something else. Recognising them saves you an afternoon:
- Login for a session token. You send a username and password to a login endpoint and get back a token to use as a bearer token until it expires. Shiprocket works this way: its documentation says the token from
/auth/loginis valid for 240 hours. - Signed requests (HMAC). Each request carries a signature calculated from its contents and a secret, so a captured request can’t be altered. Cloud infrastructure and some exchange and payment APIs use this. Calculating the signature needs code.
- Signed JWT assertions. Google service accounts, for example, sign a short-lived JWT with a private key from a JSON key file and exchange it for an access token.
- Mutual TLS. The client presents its own certificate during the HTTPS handshake. Common in banking and government APIs.
- Webhook signatures. These are the reverse direction: an app proving to you that a webhook really came from it. That’s inbound security, covered in our guide to webhook security.
How to tell which method an API uses
Open the API documentation and look for a section called Authentication, Authorization, Getting started or Making requests. Then match what it shows:
| If the docs show… | It's… | Set it up as… |
|---|---|---|
X-API-Key: YOUR_KEY or any custom header name | API key in a header | API key (header), with that exact header name |
Authorization: Bearer YOUR_TOKEN | Bearer token | Bearer token |
Authorization: Token abc, Zoho-oauthtoken abc or another prefix | A token with a custom scheme | API key (header) with header name Authorization and value Token abc |
curl -u key:secret or "HTTP Basic" | Basic auth | Basic auth, username = part before the colon |
?api_key=YOUR_KEY in the URL | API key in the query | A query parameter, and only if no header option exists |
| "Client ID", "client secret", "token URL", "grant_type" | OAuth 2.0 | A built-in connection, or a token step then a bearer token |
| "Redirect URI", "authorize URL", "consent screen" | OAuth with user sign-in | A built-in connection |
| "Signature", "HMAC", "x-signature" | Signed requests | An app connection or a developer-built service |
The fastest shortcut is the docs’ cURL example. It shows the credential in its real position. In WorkflowMitra, Import from cURL reads it for you: -u user:pass becomes Basic auth, an Authorization: Bearer header becomes a bearer token, and other headers are kept as headers. Swap the placeholder for your real key afterwards.
Setting up each method in WorkflowMitra
The HTTP Request step’s Authentication type menu has four options: No authentication, Bearer token, Basic auth, and API key (header), where you type the header name. The Bearer token and API key fields accept {{ }} values from earlier steps, which matters for the token patterns below.
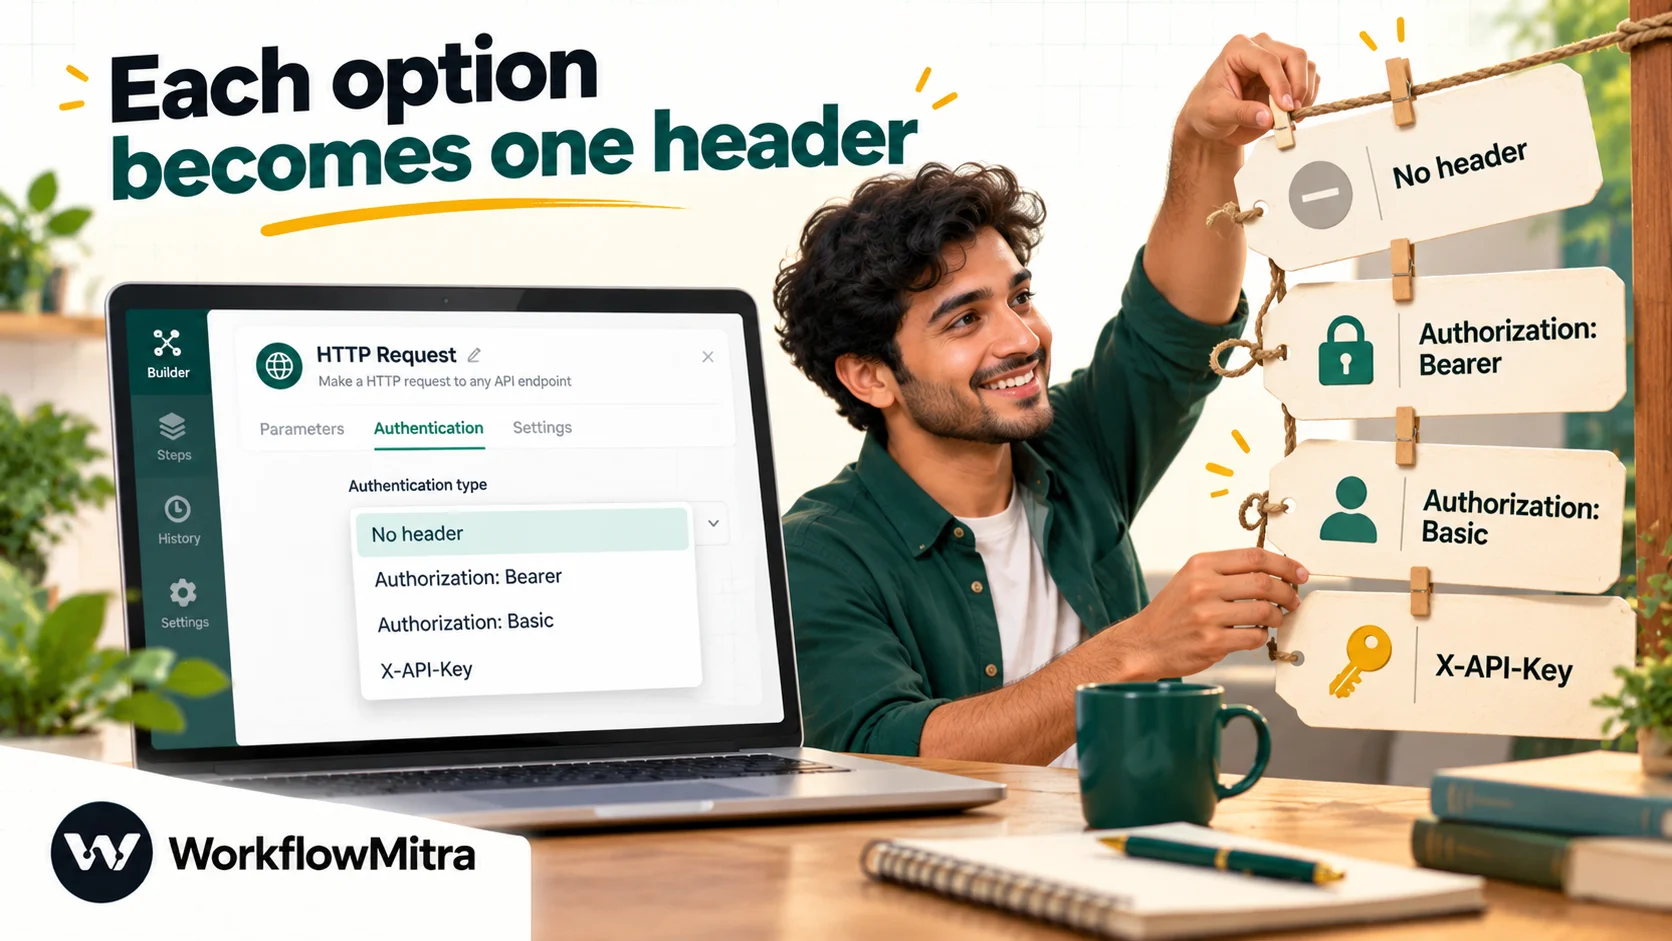
Before publication we sent each pattern through WorkflowMitra’s request code against public test endpoints. Here’s what came back:
| Setup | Result |
|---|---|
| Bearer token, correct | 200, the service saw Bearer demo-token-123 |
| No authentication on a protected URL | 401, step finished with ok = false |
| Basic auth, correct password | 200, authenticated as the user |
| Basic auth, wrong password | 401, ok = false |
API key (header) named X-API-Key | 200, the header arrived as sent |
| Key as a query parameter | 200, and the key was visible in the URL the service echoed back |
| OAuth client credentials: token step, then Bearer | 200 for the token (valid 3,600 s), then 200 for the API call |
| Bearer token that isn't valid | 401, ok = false |
The 401 rows teach the most important habit. An authentication failure doesn’t stop the run on its own. The step finishes with status = 401 and ok = false, and later steps carry on. Put an IF step right after any authenticated request that routes {{ ok }} is not true to an alert. Our guide to workflow error handling shows that pattern in full.
API key in a header
Choose API key (header), type the header name exactly as the docs show (capitalisation of header names doesn’t matter in HTTP, but spelling does), and paste the key. For a custom-prefix scheme like Authorization: Token abc, use Authorization as the header name and Token abc as the value.
If an API needs two credentials at once, such as a key and an account ID, put one in the authentication field and add the other under Headers.
Bearer token
Choose Bearer token and paste the token without the word “Bearer”; the step adds it. Personal access tokens with an expiry date need a calendar reminder: when the date passes, every run gets a 401.
Basic auth
Choose Basic auth and fill in the username and password fields using the mapping from the API’s docs, such as key and X for Freshdesk. The step encodes them for you. Double-check that the URL starts with https://.
OAuth 2.0 with client credentials
The editor doesn’t list OAuth 2.0 as an authentication type, but the client credentials grant is two ordinary requests, so you can build it:
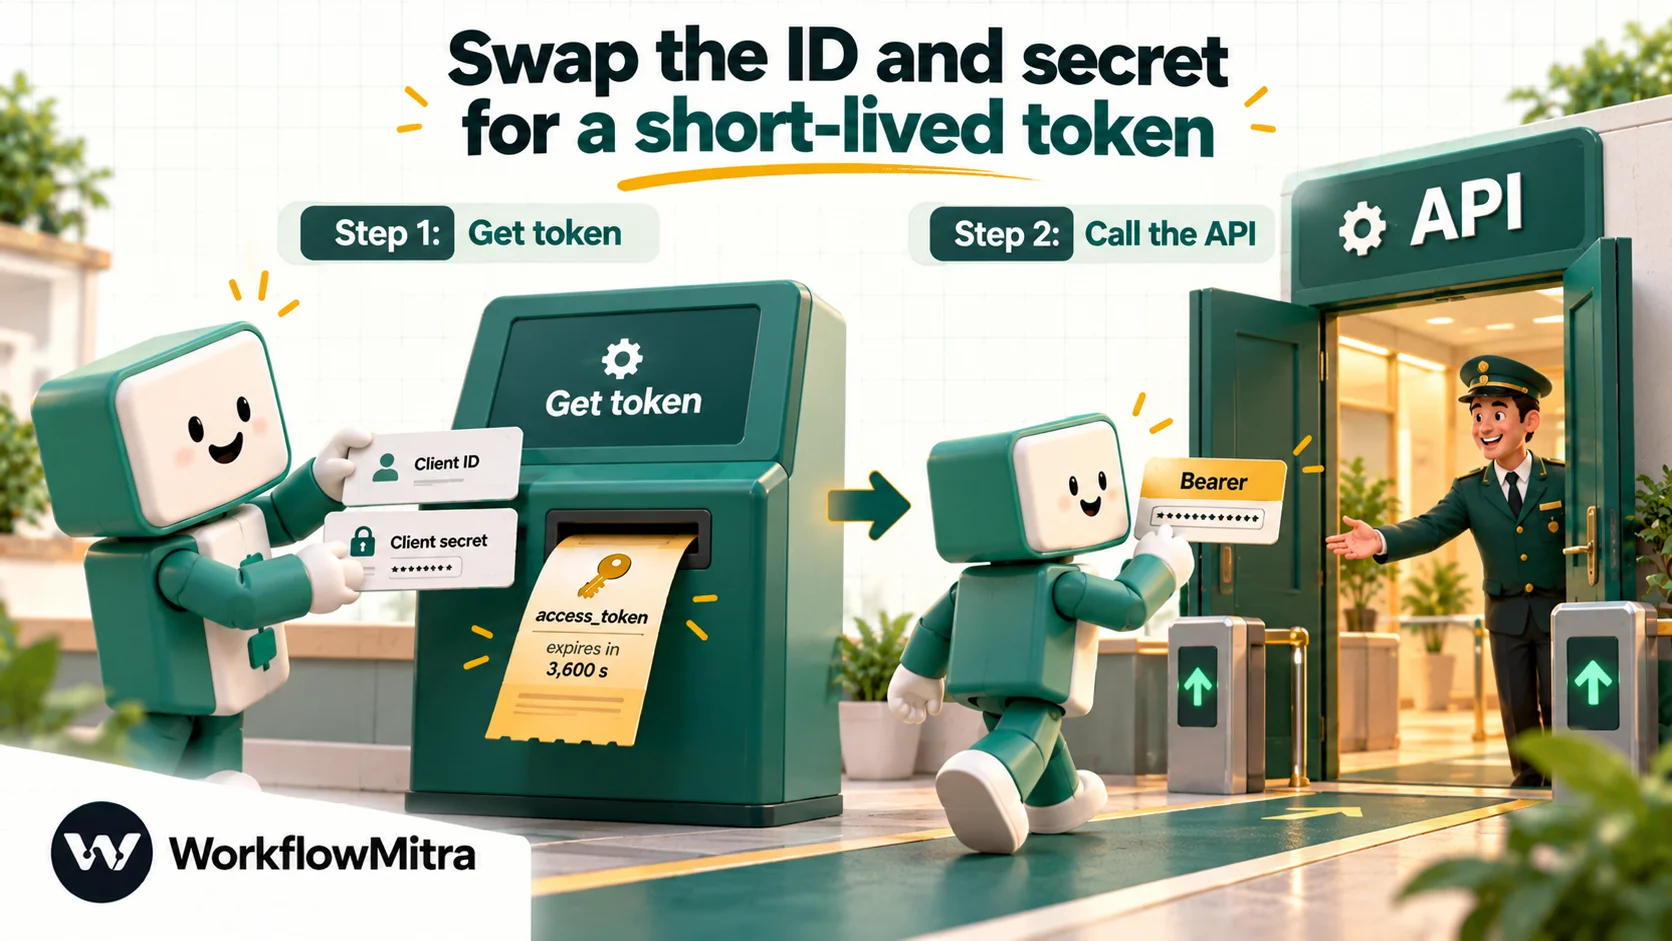
- Add an HTTP Request step named “Get token”. Method POST, URL = the token endpoint from the docs.
- Authentication: Basic auth, with the client ID as the username and the client secret as the password. Most token endpoints accept this; if the docs say the ID and secret go in the body, add them there instead.
- Header:
Content-Type=application/x-www-form-urlencoded. - Body: Raw, with the form text from the docs, for example
grant_type=client_credentials&scope=api. Fixed text like this needs no encoding. If any value comes from an earlier step, encode it first, as explained in our connect any API without code guide. - Add an IF step that stops the run if
{{ ok }}is not true, so a refused token doesn’t cascade into confusing errors. - Add the real API call with Bearer token =
{{ $node["Get token"].body.access_token }}.
This fetches a fresh token on every run. That’s fine for a workflow that runs a few times an hour. For one that runs constantly, check the provider’s limits on the token endpoint first, because some count and cap token requests.
OAuth with a user sign-in
Flows where a person approves access in a browser need a redirect address registered with the provider and somewhere safe to keep the refresh token. That’s what an app connection is for. In WorkflowMitra, the Google connection and the Zoho CRM, Zoho Books and Zoho Desk connections store the OAuth details and renew access tokens themselves. App Request then calls the APIs of 14 business apps, including the Zoho apps, HubSpot and Shopify, “signed in for you”. The Zoho connection reuses a token until it nears expiry rather than requesting a new one each run, precisely because of the ten-tokens-in-ten-minutes limit. When a provider issues a new refresh token during renewal, the connection saves it. A hand-built refresh flow can’t easily do either.
Session tokens
For a login-for-a-token API, a first step can call the login endpoint and a second can use {{ body.token }} (or whatever field the docs name) as its bearer token. Logging in on every run, though, can trip login throttling. For Shiprocket specifically, the WorkflowMitra connection handles the login and reuses the token.
What the HTTP Request step can’t do
Being clear about limits saves time: the HTTP Request step can’t calculate HMAC request signatures, sign JWT assertions or present client certificates. For those APIs, use an app connection if one exists, or ask a developer for a small intermediary service that adds the signature.
Where your secrets live, and why it matters
This is the part most tutorials skip, and the difference is real.
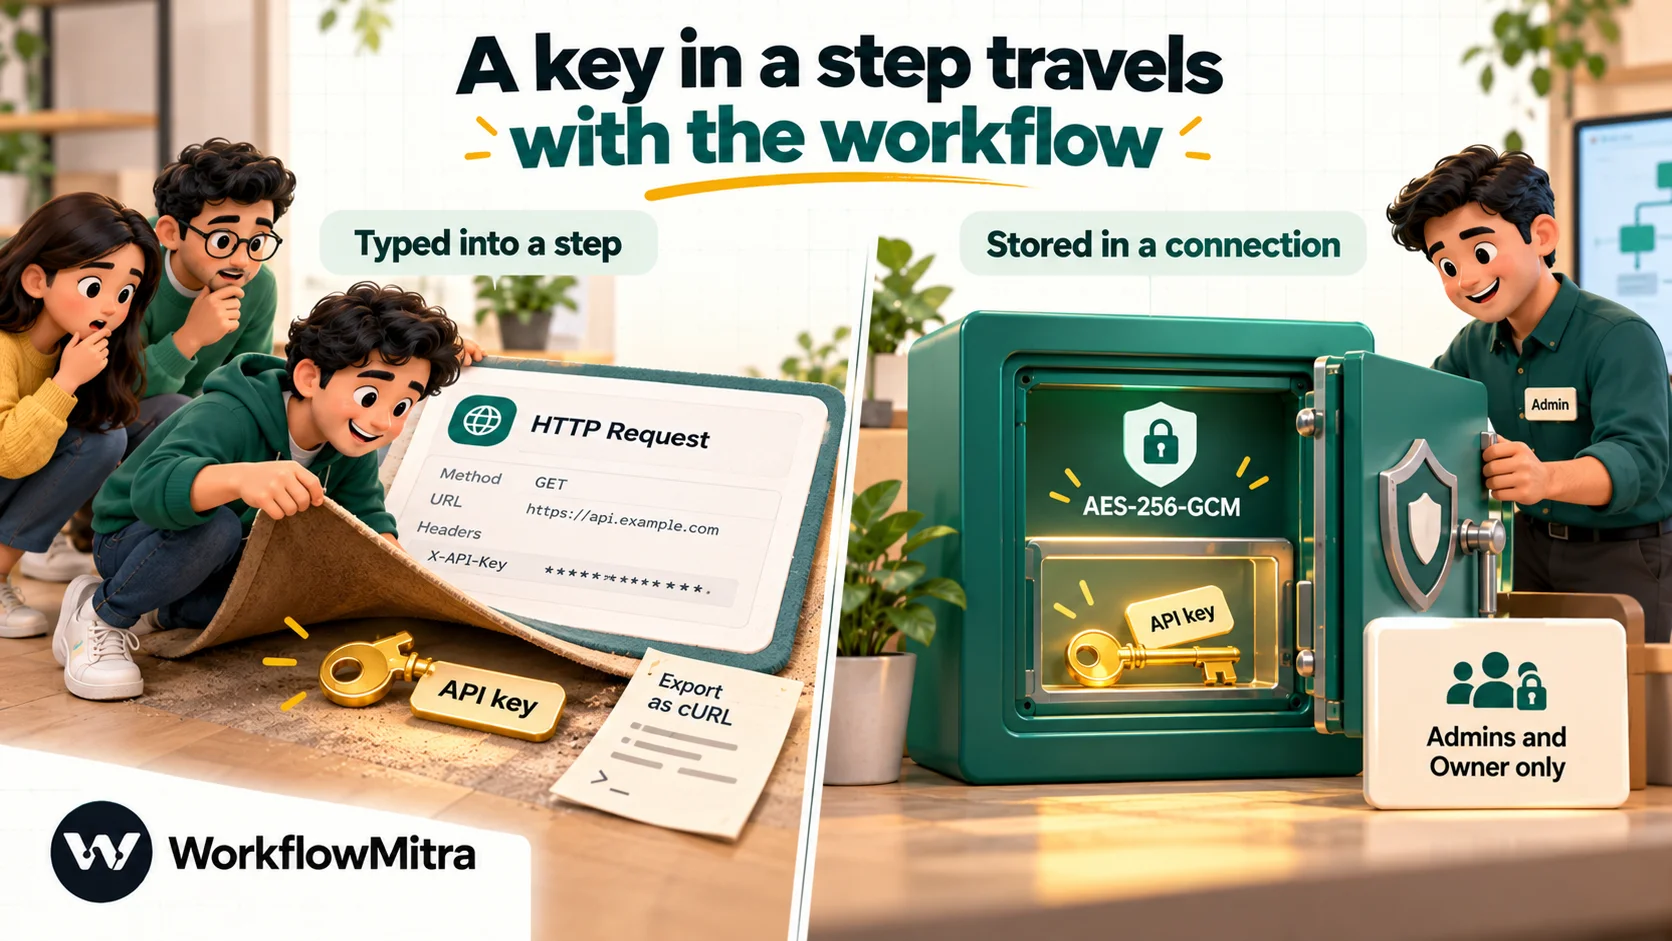
A credential typed into an HTTP Request step is saved inside that workflow’s definition. Anyone in the workspace who can open the workflow can read it, Viewers included, and Export as cURL puts it on the clipboard in plain text, which is useful for a developer reproducing a request and risky if the command gets pasted into a chat. The step’s output doesn’t include the headers you sent, so the key doesn’t end up in run history through the step itself, but the definition is still the weak point.
A credential in an app connection is stored encrypted (AES-256-GCM in WorkflowMitra’s credential vault). Only workspace Admins and the Owner can create or change connections, and the form never sends a saved secret back to the browser, so it can’t be read over someone’s shoulder.
That leads to a simple rule: use a connection whenever one exists for the app, and the HTTP Request step only when it doesn’t. When you do type a key into a step:
- Create a dedicated key for that workflow, with the narrowest permissions the job needs, so revoking it breaks nothing else.
- Prefer expiring tokens when the service lets you set an expiry, and calendar the renewal.
- Limit who belongs to the workspace, because every member, including Viewers, can open its workflows.
- Rotate keys when someone with access leaves, and delete keys no workflow uses.
- Strip credentials before testing with echo services such as httpbin. They show you exactly what you sent, which is the point, and also the problem.
Troubleshooting authentication errors
Most authentication problems fall into a few patterns:
| Symptom | Likely cause | Fix |
|---|---|---|
| 401 on the first try | Wrong key, wrong header name, or "Bearer" typed twice | Compare with the docs' cURL example; re-import it |
| 401 after working for about an hour | An OAuth access token pasted by hand has expired | Use an app connection, or fetch a token at the start of each run |
| 401 after working for weeks | A personal token reached its expiry date, or the key was rotated | Issue a new token; set a renewal reminder |
| 403 | The credential lacks a permission or scope, or the plan doesn't include that endpoint | Widen the token's permissions or scopes, or check the plan |
400 with invalid_client | Wrong client ID or secret, or sent in the body instead of Basic (or vice versa) | Check where the token endpoint expects them |
400 with invalid_grant | The refresh token was revoked, already used, or belongs to another client | Reconnect the app to get a new refresh token |
| Works in Postman, fails in the workflow | Postman added a header you didn't copy, or used a different environment's key | Export Postman's request as cURL and import it |
| 429 from a token endpoint | Too many token requests | Reuse tokens via a connection, or run less often |
When an API answers 401, look at the response headers in the step’s output. Many APIs include a WWW-Authenticate header naming the scheme they expected and sometimes the reason, such as an expired token.
A short security checklist for no-code builders
Most leaked API keys aren’t stolen by attackers. They’re pasted into the wrong place by someone in a hurry. Before a workflow with credentials goes live, check:
- The URL starts with
https://. - The credential sits in a header, not the URL, unless the API offers nothing else.
- The key is used by this workflow alone and has only the permissions it needs.
- An app connection was used if the app has one.
- An IF on
okcatches 401 and 403 responses and alerts someone. - Nobody has pasted the key into a chat, a ticket, a spreadsheet or a public decoder.
- There’s a note of where the key came from, who owns it and when it expires.
OWASP ranks broken authentication second in its API Security Top 10. Most of that list is for the teams building APIs, but the caller’s side is the half you control.
Why use WorkflowMitra for authenticated API calls?
If your work is mostly calling business APIs and acting on the results, WorkflowMitra by ChatMitra makes the authentication part manageable:
- Docs to working request in one paste. Import from cURL places the credential in the right auth field, and the menu covers the three static methods most APIs use.
- Connections that renew themselves. For Google, the Zoho apps and Shiprocket, connections keep secrets encrypted and refresh or re-mint tokens without a hand-built token step, and App Request reaches 14 business apps’ APIs already signed in.
- Failures you can see. Every response carries
statusandok, so a 401 becomes a branch you handle, not a silent gap. - One messaging layer when results need to reach people. A workflow can send what an API returns through ChatMitra, the WhatsApp Business messaging platform that powers WorkflowMitra, with the ChatMitra API key stored in an encrypted connection like any other.
The gaps are worth stating plainly: there’s no OAuth 2.0 option in the HTTP Request editor, no generic encrypted credential for arbitrary APIs, and no support for HMAC signing or client certificates. If most of your integrations are with APIs that need those, a developer-oriented platform or a small custom service may serve you better.
What authenticated calls cost
Every HTTP Request or App Request step uses 1 credit each time it runs, including runs that return a 401. A hand-built OAuth token step is a second request, so the client credentials pattern costs 2 credits per run where a connection-based call costs 1. IF steps are free. Plans start at 10,000 credits for ₹999 a month, after a 14-day trial with 10,000 credits and no card.
Start with the authentication section
Pick the API you want to connect, open its documentation and find the authentication section and a cURL example. Use the “If the docs show…” table above to name the method, then import the cURL into an HTTP Request step behind a manual trigger, swap in a dedicated key, run it and read the status.
You can try it in a 14-day WorkflowMitra trial. If you’re new to calling APIs, start with our guide to connecting any API without code; if you’re also receiving data from other apps, the webhook security guide covers the inbound side. ChatMitra users connecting their own systems will find the account-side steps in WhatsApp API keys and webhook URL explained.
WorkflowMitra behaviour described here, including the HTTP Request authentication options, output fields, cURL import and export, OAuth token handling, connection encryption, roles and credit rates, comes from its source code as of 8 October 2026. The bearer, basic, API key and OAuth client credentials examples were sent through the same request code to httpbin.org and Duende Software's public demo identity server on that date. Standards are from RFC 6750, RFC 7617 and RFC 9700 and the OWASP API Security Top 10 (2023); Zoho, Zendesk, Freshdesk and Shiprocket details are from their documentation, all read the same day.
Frequently Asked Questions
Short answers to the questions no-code builders ask when an API asks them to authenticate.
The four you'll meet most are API keys, bearer tokens, basic authentication and OAuth 2.0. Less common ones include login-for-a-token (session tokens), signed requests using HMAC, signed JWT assertions such as Google service accounts, and mutual TLS with client certificates. An API's documentation states which one it accepts, usually in a section called Authentication.
Automate the work between your apps
Build workflows with triggers, conditions and actions, then test them before they go live. Try WorkflowMitra free for 14 days, no card required.