Customer Onboarding Automation: Turn New Sign-Ups Into Active Customers

Quick Summary
Customer onboarding automation uses workflows to run the repeatable parts of welcoming a new customer: the welcome message, assigning an owner, chasing forms and documents, nudging people to book a kickoff, and checking in at set points. A good setup starts from a clear signal that someone has signed up, keeps one record per customer, sends each message only if it still applies, and hands the customer to a person when they get stuck. In WorkflowMitra, powered by ChatMitra, the same workflow can send email, alert the team on Slack and send WhatsApp templates through ChatMitra or Meta's Cloud API.
The riskiest days in a customer relationship are the first few after they pay. They have just made a decision, they are not yet getting value, and they are waiting to hear what happens next. In many small and mid-size businesses, what happens next depends on whether one busy person remembers to send the welcome email, chase the intake form and book the kickoff call.
Customer onboarding automation takes the remembering out of that. This guide explains what to automate and what to leave to people, how to map an onboarding process before building anything, and how to build two working workflows: one that welcomes each new customer within minutes, and one that sends the right follow-up on the right day and stops when it is no longer needed. The examples use WorkflowMitra, powered by ChatMitra, but the design advice applies to any automation tool.
What is customer onboarding automation?
Customer onboarding automation is the use of workflows to run the repeatable parts of getting a new customer started: welcoming them, assigning an owner, collecting forms and documents, nudging them to book a kickoff, and checking in at planned points. A signal such as a payment or a signed proposal starts it. A record tracks where each customer is. Timed steps send the next message only if it still applies, and a person takes over when a customer gets stuck.
The word that matters is repeatable. Every new customer of an accounting practice needs to receive the same document checklist. Every new agency client needs to be told who their account manager is. Those steps don’t need judgement, so a workflow can do them the same way every time, at any hour. The kickoff conversation, the review of a messy intake form and the call with a confused customer still need a person, and good onboarding automation makes sure that person knows when to step in.
If triggers, steps and conditions are new to you, what is workflow automation covers the vocabulary used here.
Which kind of onboarding does this guide cover?
“Onboarding” means three different things, and search results mix them up:
| Type | Who is onboarded | Typical tools | Covered here? |
|---|---|---|---|
| Customer or client onboarding | A new buyer of a service or subscription | Email, WhatsApp, forms, CRM, workflow automation | Yes |
| In-app product onboarding | A new user inside a software product | Product tours, tooltips, in-app checklists | Only the messages around it |
| Employee onboarding | A new hire | HR software, IT provisioning | No |
This guide is for businesses where onboarding is a series of tasks and conversations: accounting and legal practices, agencies, consultancies, coaching and training providers, clinics, B2B suppliers and subscription services. If you run a software product, the same workflows handle the emails and WhatsApp nudges around your in-app tour, but the tour itself belongs in your product.
What to automate and what to keep human
Before building, sort each onboarding task into one of three groups. It prevents the most common failure, which is automating a conversation that needed a person.
| Automate fully | Automate the nudge, not the task | Keep human |
|---|---|---|
| Welcome message with next steps | Reminders to submit the intake form | The kickoff call itself |
| Creating the customer record | Reminders to upload documents | Reviewing intake answers |
| Assigning an onboarding owner | Nudges to book the kickoff | Custom setup and configuration |
| Alerting the owner and the team | Check-ins at day 7 and day 30 | Conversations with unhappy customers |
| Logging every message sent | Escalating a stuck customer to the owner | Decisions about refunds or exceptions |
The middle column is where most of the value sits. A workflow can’t fill in a client’s tax questionnaire, but it can notice on day two that the questionnaire hasn’t arrived, send a polite reminder, and on day ten tell the account manager that this client needs a phone call.
Map the onboarding before you build it
Most onboarding automations that disappoint were built message-first: someone wrote six emails, spaced them three days apart and called it a sequence. Map the process from the customer’s side first. Four questions are enough.
1. What is the first result? Pick the moment a customer gets real value: the first monthly report delivered, the first campaign live, the first class attended, the first order placed through your portal. Onboarding ends there. Everything before it is a milestone on the way.
2. Which milestones lead to it, and how will you know each one happened? A milestone you can’t detect can’t drive automation. “Intake form received” is detectable if the form writes to a sheet. “Customer understands our process” is not.
3. Who owns each customer? Even with full automation, each customer needs one named person who receives the alerts and makes the calls.
4. How long should each milestone take? This sets the timing of reminders. If most customers return the intake form within two days, the first reminder belongs on day two or three, not day one.
Here is the map for a small accounting practice onboarding a new monthly bookkeeping client:
| Milestone | How it is detected | Normal time | If late |
|---|---|---|---|
| Proposal accepted and first invoice paid | Payment webhook or a status change in the client sheet | Day 0 | Not part of onboarding |
| Intake questionnaire returned | Form response row with the client's email | 2 days | Reminder on day 2 |
| Kickoff call booked | Owner ticks "kickoff booked" | 4 days | Nudge with the booking link on day 4 |
| Bank and payroll access shared | Owner ticks "access received" | 7 days | Covered in the day 7 check-in |
| Stuck | Intake or kickoff still missing | Day 10 | Alert the owner to call |
| First monthly report delivered | Owner sets status to "done" | About 30 days | Day 30 review message |
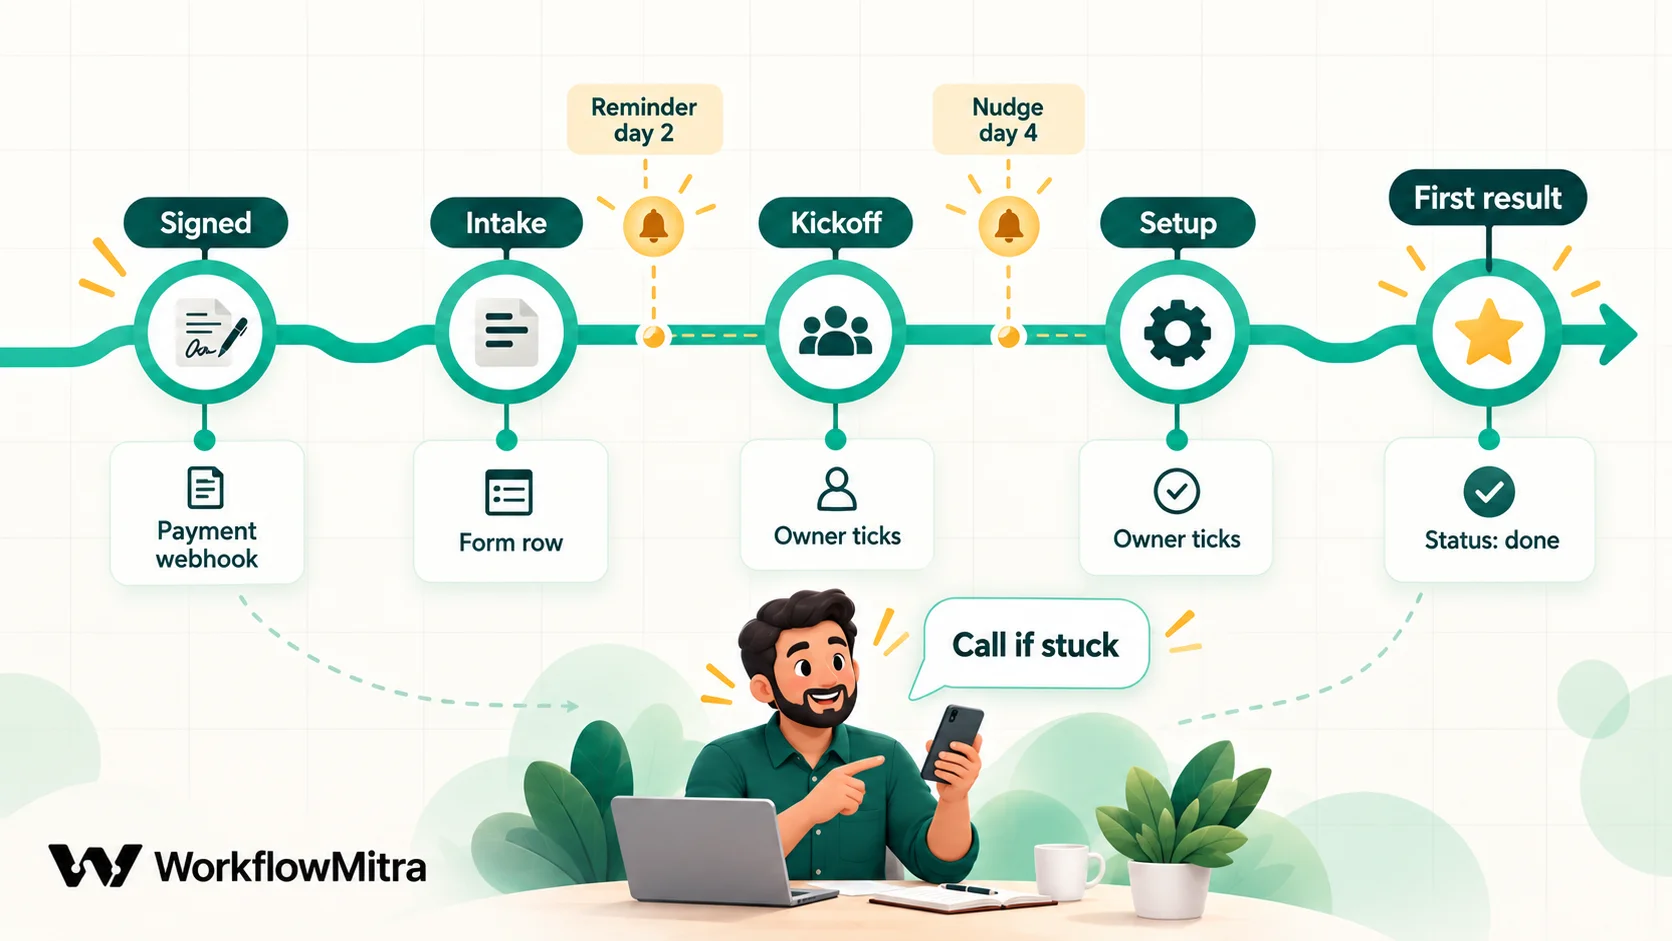
Notice what the map does not contain: a message every day. Four or five well-timed touches in a month is plenty for most service relationships.
The four parts of an onboarding workflow
Whatever tool you use, a reliable onboarding automation has four parts.
- A start signal. One event that means “this is now a customer”: a successful payment, a signed proposal, a CRM deal moved to Won, a row added to a client sheet. Choose one. Two start signals for the same customer produce two welcome messages.
- A customer record. One row or record per customer holding their contact details, owner, start date, milestone status and a log of what has been sent. Every later step reads it and writes back to it.
- Timed steps. The reminders and check-ins, each with a condition: “send on day 2 if the intake hasn’t arrived”.
- Stop conditions and handoffs. Rules for when the automation goes quiet (the customer finished, cancelled or asked to stop) and when it hands over to a person (stuck, unhappy, confused).
Teams usually build the first and third parts and forget the second and fourth. Without a record, the automation can’t know what already happened. Without stop conditions, it carries on regardless.
Two ways to run the timed steps
There are two common designs for the follow-up messages, and the choice matters more than which messages you write.
The wait chain. One workflow starts when the customer signs up, sends the welcome, then waits two days, checks the record, maybe sends a reminder, waits two more days, and so on. It is easy to picture and quick to build.
The daily sweep. The welcome workflow only does day-0 work and writes the customer record. A second workflow runs once a day, reads every active customer, works out which message (if any) each one is due today, sends it and logs it.
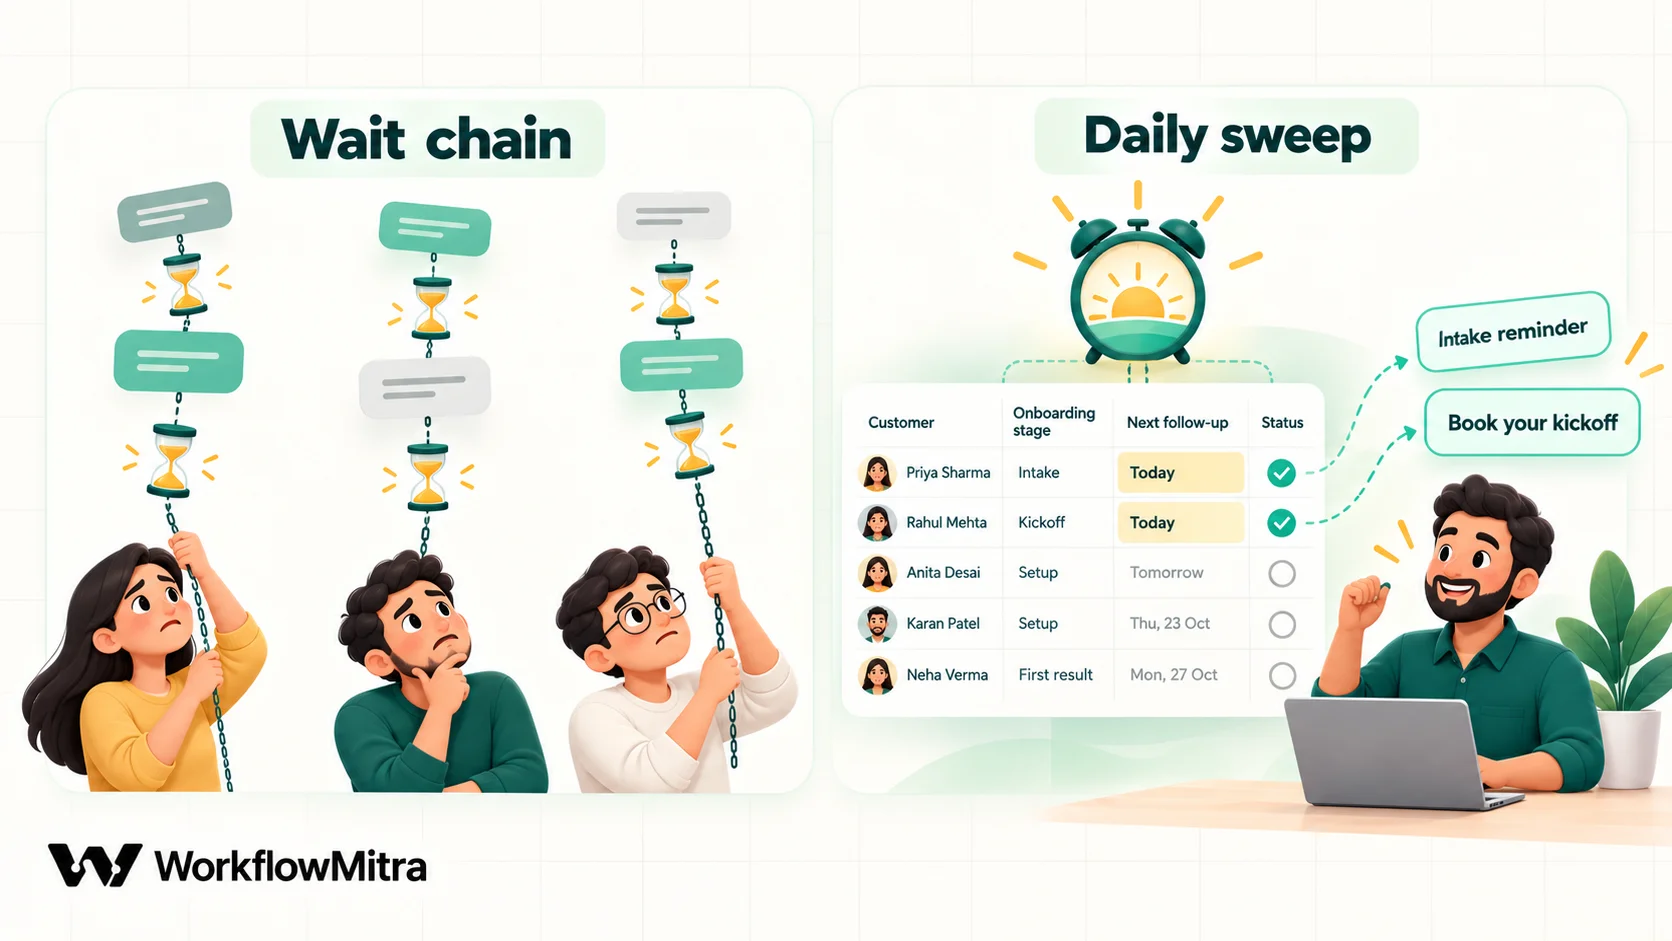
In WorkflowMitra, a wait chain uses the Delay step, which pauses a run durably for up to 30 days and resumes on its own. It has some properties you need to know before relying on it for a month-long sequence:
- A waiting run keeps the version it started with. If you rewrite the day-7 message today, customers already part-way through still receive the old one.
- There is no button to cancel a single waiting run, and switching the workflow off stops new runs but not ones that are already waiting. The only way to stop a message is a check after each wait.
- The wait is a fixed length, entered in days, hours and minutes. It can’t be “until the customer’s kickoff date”.
- A Delay can’t sit inside a Loop, so one run can’t wait separately for each item of a list.
- If your plan ends or you run out of credits while a run is waiting, the run fails when it tries to resume.
None of these are problems for a short sequence: a welcome, a two-day wait, one reminder if the form is missing. For anything longer, the daily sweep is easier to live with:
| Question | Wait chain | Daily sweep |
|---|---|---|
| Can you change a message for everyone mid-way? | No, running copies keep the old version | Yes, from the next morning |
| Can you pause one customer? | Only by a status check after each wait | Set their status to "paused" |
| Can you see who gets what today? | Hard: it is spread across waiting runs | Yes: the sheet and the day's run |
| Messages arrive at a sensible hour? | Depends on when the customer signed up | Always at the time you schedule |
| Effort to build | Lower | A little higher (one Code step) |
| Best for | Sequences of a few days | Sequences of weeks, or many customers |
The rest of this guide builds a welcome workflow and a daily sweep, then shows the short wait-chain version for teams that only need one reminder.
Workflow 1: welcome every new customer within minutes
This workflow handles everything that should happen the moment someone becomes a customer.
Step 1: Choose the start signal
Pick the event that most reliably means “new customer” in your business. In WorkflowMitra, common choices are:
- A payment. The Webhook trigger has signed presets for Razorpay and Stripe. If you use Razorpay, give onboarding its own webhook URL subscribed to one event, such as payment captured; Razorpay to WhatsApp explains why mixing events on one URL can drop some.
- A form. Presets cover Typeform and website forms, and a Google Form can feed a Google Sheet that the sheet trigger watches.
- A status change in a sheet. If sales marks a client “Won” in a Google Sheet, the Google Sheets trigger’s “One column changes” option starts the workflow only when that column changes, which also avoids loops when the workflow later writes to the same row.
- Your CRM. Zoho CRM workflow rules can call a webhook (on Zoho’s Professional edition and above), covered in Zoho CRM WhatsApp integration. HubSpot has no native trigger in WorkflowMitra, so a sheet or payment signal is simpler there.
If you can’t decide, use the event that finance trusts. A paid invoice is harder to fake by accident than a form submission.
Step 2: Create the customer record
Add a Google Sheets step, “Add row(s)”, to an Onboarding tab with these columns: email, name, phone, plan, owner, start_date, status, intake_received, kickoff_booked, sent.
- Set
statustoactiveand leave the milestone columns empty. - Format the
start_datecolumn as plain text, and write dates as2026-10-07. Before the Sheets step, add a one-line Code step that produces today’s date in your time zone, because the expression date helpers use the server’s clock:
return { ...input, start_date: new Intl.DateTimeFormat('en-CA', { timeZone: 'Asia/Kolkata' }).format(new Date()) };- In the Sheets step, choose “Exactly as written” so the date stays text.
Prefer the built-in Data Store if no person needs to read the list; it has “Create or update (upsert)” keyed on the email address. Most small teams pick a sheet because the owners will tick milestones in it by hand. Google Sheets automation covers sheet triggers, reading and updating rows in more depth.
Guard against duplicates here. Payment gateways retry webhooks, and people submit forms twice. Before adding the row, use “Find row” on the email column and an IF step: if a row already exists, stop.
Step 3: Assign an onboarding owner
Add the “Assign to the next person” step with your onboarding team. It hands out customers in strict rotation, so nobody gets three in a row while someone else gets none. It returns the owner’s name and a contact value you choose, such as their email or Slack handle. Write the owner into the customer record. Round-robin lead assignment explains the rotation, including what happens when you add or remove people.
If owners are fixed by region or service line, use a Switch step on the plan or country instead.
Step 4: Send the welcome
Send the welcome by email, with the detail, and optionally a short WhatsApp message pointing to it.
Email. The email step can send HTML and attach files, either uploaded once (a welcome guide PDF) or fetched from a URL at send time. A good welcome email answers four questions: who is your contact, what happens next, what do we need from you and by when, and how do you reach us. Put the intake form link and the kickoff booking link in it.
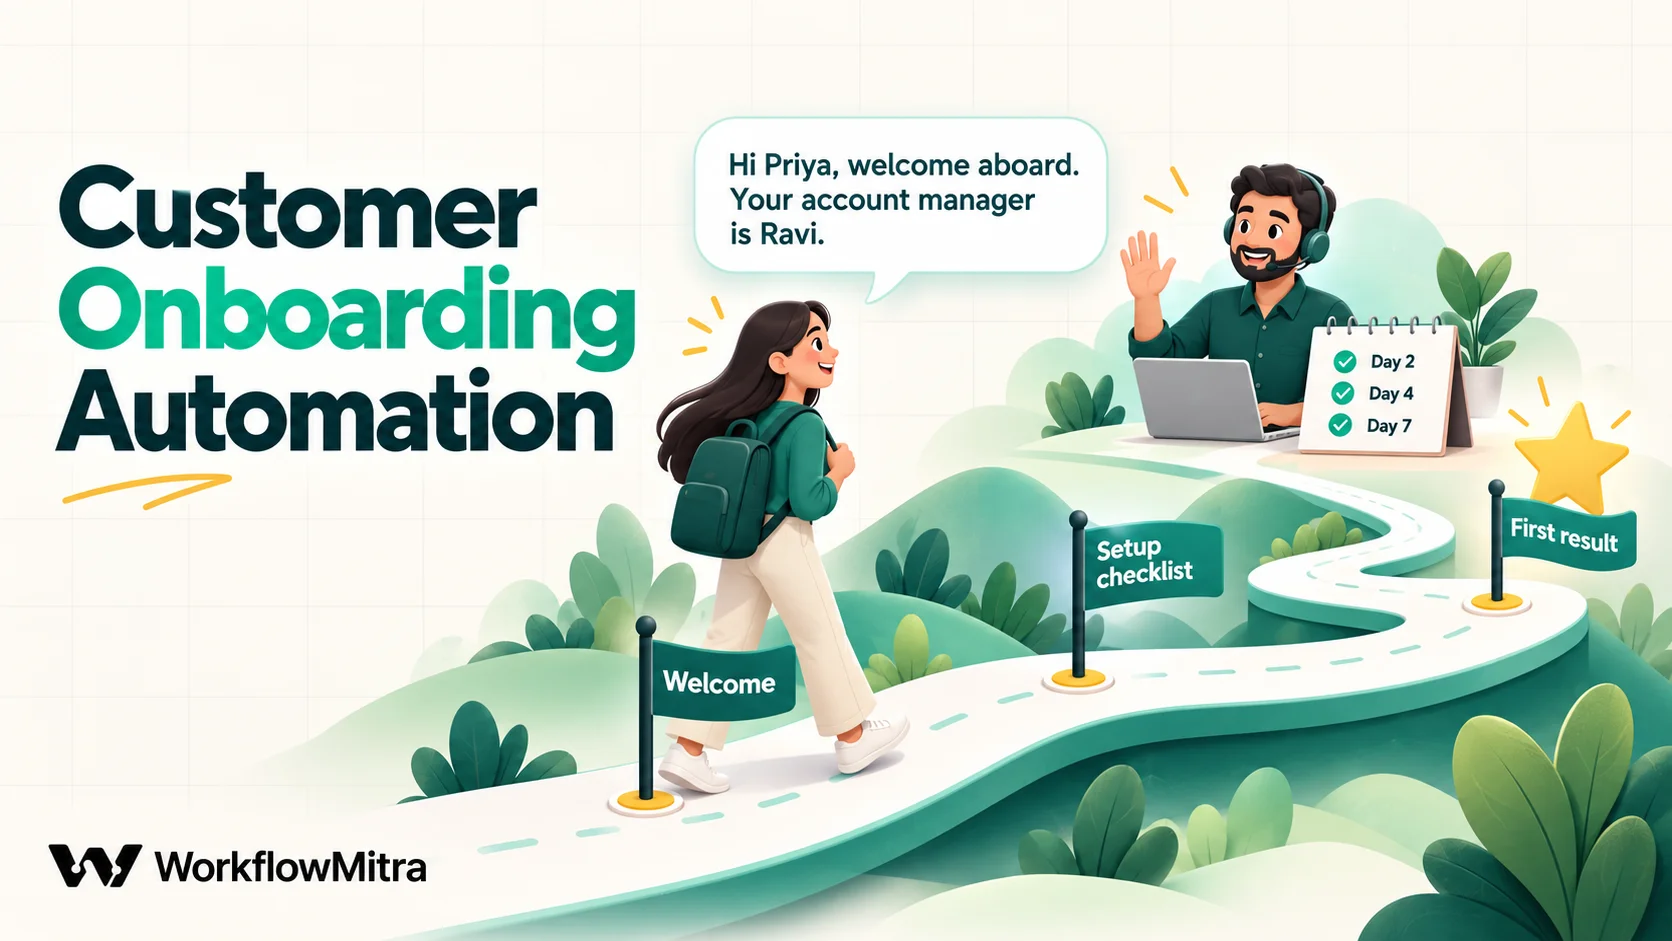
WhatsApp. The WhatsApp step sends through ChatMitra or Meta’s Cloud API directly, with a picker for your approved templates. Keep it short: “Hi Priya, welcome aboard. Your account manager is Ravi. Your setup checklist is in your inbox; the first step is the intake form, which takes about ten minutes.” For message wording, ChatMitra’s guide to the welcome message for customers has examples you can adapt.
The email step signs in to your mailbox with an app password. Gmail and Google Workspace, Zoho Mail, Yahoo and iCloud work; Outlook.com and Microsoft 365 mailboxes can’t connect this way because Microsoft has switched off app-password sign-in for them.
Step 5: Tell the owner
Finish with a Slack message or an email to the assigned owner: the customer’s name, plan, contact details and a link to the sheet row. The owner’s first job is a personal note or call within a working day. The automation buys them time; it doesn’t replace them.
The whole workflow, without the duplicate check, is: trigger → Code (date) → Sheets add row → Assign → Sheets update owner → Email → WhatsApp → Slack.
Workflow 2: the daily follow-up sweep
This workflow runs every morning, decides who needs which message today, sends it and records it.
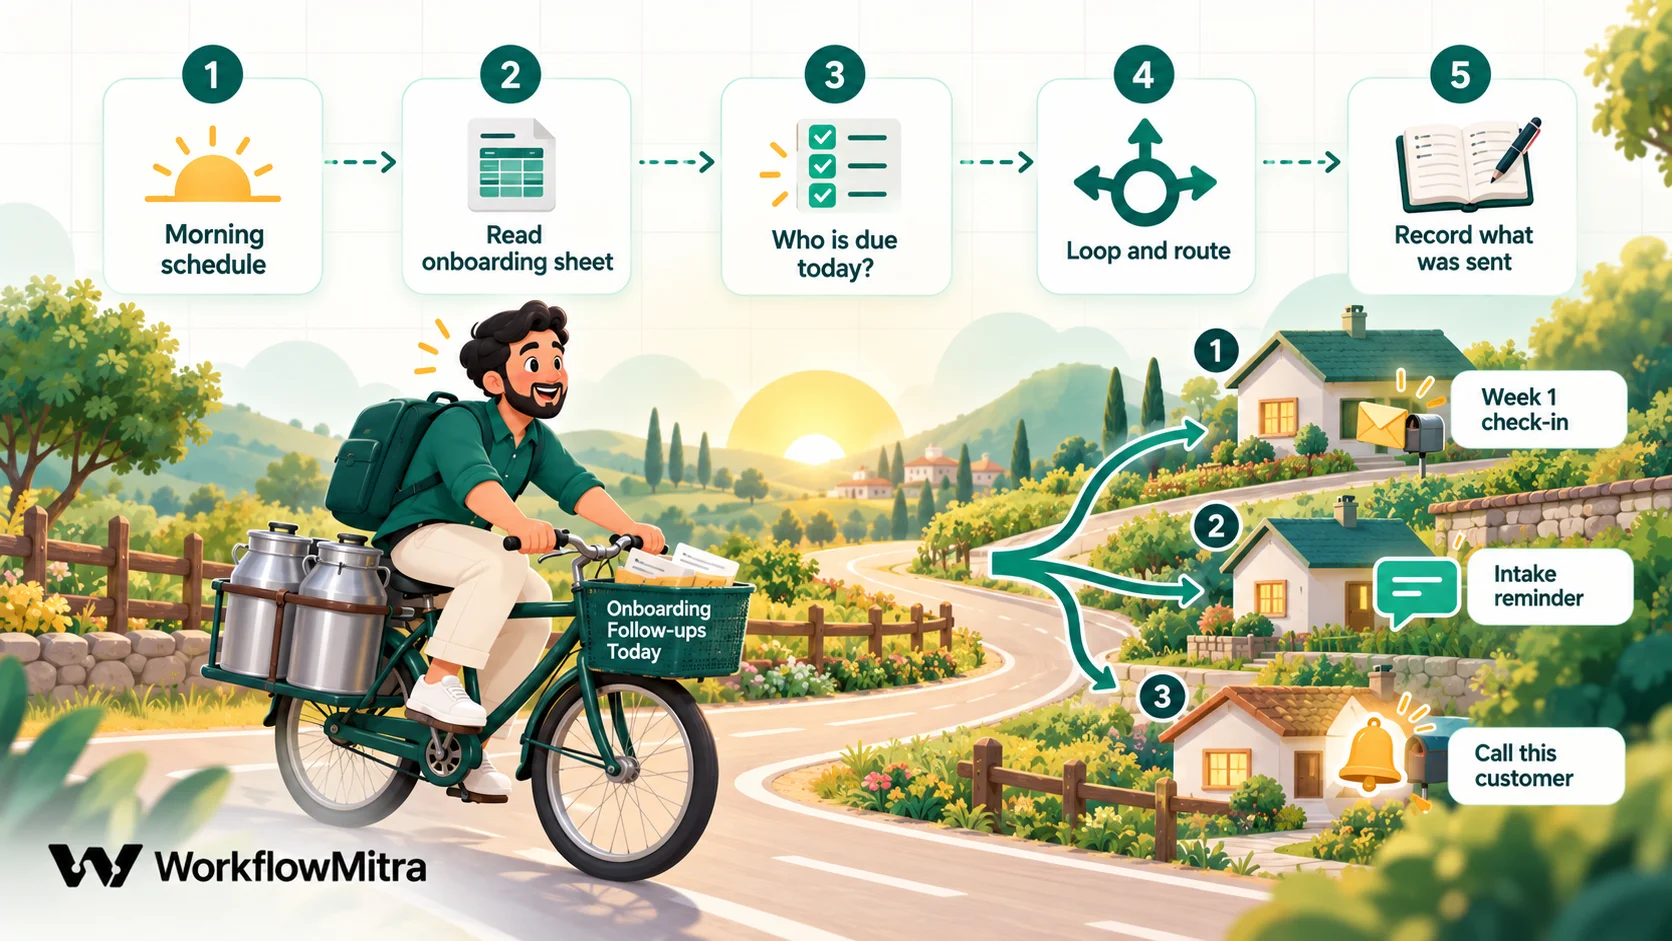
Step 1: Schedule it
Use the Schedule trigger, daily, at a time customers will welcome a message, such as 10:00, and set the time zone explicitly. If your customers span time zones, run one sweep per region with a filter on a region column.
Step 2: Read active customers
Add a Google Sheets “Read rows” step on the Onboarding tab. It returns the rows as a list with the column names as keys. One read returns up to 50,000 rows, but a sweep stays faster and easier to check if you move finished customers to an archive tab every month or so.
Step 3: Decide what is due
Add a Code step. This snippet holds the whole message plan in one place and picks at most one message per customer per day:
// Which onboarding message is due today, for each active customer?
const TIME_ZONE = 'Asia/Kolkata';   // your team's time zone
const LATE_LIMIT = 3;               // don't send a message more than 3 days late

// key, day after start, and when to skip it
const PLAN = [
  { key: 'intake_reminder',  day: 2,  skip: (c) => c.intake_received === 'yes' },
  { key: 'kickoff_nudge',    day: 4,  skip: (c) => c.kickoff_booked === 'yes' },
  { key: 'week1_checkin',    day: 7,  skip: () => false },
  { key: 'stuck_alert',      day: 10, skip: (c) => c.intake_received === 'yes' && c.kickoff_booked === 'yes' },
  { key: 'day30_review',     day: 30, skip: () => false },
];

const today = new Intl.DateTimeFormat('en-CA', { timeZone: TIME_ZONE }).format(new Date());
const daysSince = (start) =>
  Math.round((Date.parse(today + 'T00:00:00Z') - Date.parse(start + 'T00:00:00Z')) / 86400000);
const clean = (v) => String(v == null ? '' : v).trim().toLowerCase();

const due = [];
const problems = [];

for (const c of input.rows || []) {
  if (clean(c.status) !== 'active') continue;
  const start = String(c.start_date || '').trim();
  if (!/^\d{4}-\d{2}-\d{2}$/.test(start)) {
    problems.push({ email: c.email, issue: 'start_date is not YYYY-MM-DD: ' + start });
    continue;
  }
  const sent = String(c.sent || '').split(',').map((s) => s.trim()).filter(Boolean);
  const day = daysSince(start);
  const next = PLAN.find((p) =>
    day >= p.day && day - p.day <= LATE_LIMIT && !sent.includes(p.key) && !p.skip({
      intake_received: clean(c.intake_received),
      kickoff_booked: clean(c.kickoff_booked),
    }));
  if (!next) continue;
  due.push({
    email: c.email, name: c.name, phone: String(c.phone || '').replace(/\D/g, ''),
    owner: c.owner, day, message: next.key,
    sent: sent.concat(next.key).join(','),
  });
}

return { today, count: due.length, due, problems };
A few design choices are worth explaining:
- Status first. Anyone not
active(done, paused, cancelled) is skipped, so stopping a customer is a matter of changing one cell. - Skip rules read the milestones. The intake reminder never goes to someone who already sent the form.
- The late limit. If the workflow was off for a week, it won’t fire a week’s worth of stale reminders on its return. Messages more than three days overdue are dropped.
- One message a day at most.
findtakes the first eligible message, so nobody receives two on the same morning. - Bad dates are reported, not guessed. A row with
12/10/2026lands inproblemsinstead of being read as December or October.
The stuck_alert key is internal: it goes to the owner, not the customer.
Step 4: Loop and route
Add a Loop step with the items path due. Inside the loop, add a Switch with one route per message key:
intake_reminderandkickoff_nudge: WhatsApp template with the form or booking link.week1_checkinandday30_review: email, so the customer can reply at length.stuck_alert: Slack or email to the owner with the customer’s details.
Inside a Loop, the steps run once per item, and each pass treats the current item as its starting data. The step straight after the Switch can use {{ name }} and {{ phone }}; later steps in the same pass should use {{ $trigger.email }}, because a plain {{ }} only reads the step immediately before.
Step 5: Record what was sent
End each route with a Google Sheets “Update row” that finds the row by email and writes the new sent value. Recording after sending means a failed send is retried the next morning. If you need certainty that a customer never gets a message twice, write the log before sending; you then risk a missed message instead of a duplicate. Choose deliberately.
Finally, after the loop, send yourself the problems list when it isn’t empty, so bad rows get fixed.
The short version: one reminder with Delay
If all you need is “welcome, then one reminder if the form hasn’t arrived”, skip the sweep. After the welcome steps in Workflow 1, add:
- Delay for 2 days.
- Find row in the Onboarding tab by
{{ $trigger.email }}. - IF
intake_receivedis notyesandstatusisactive. - WhatsApp or email reminder on the true branch.
The check in steps 2 and 3 is not optional. It is the only way to stop a waiting run from sending a reminder to someone who finished, paused or cancelled.
Writing the sequence: timing, channel and tone
The workflows decide when. The messages decide whether customers act. A message plan for a four-week onboarding might look like this:
| When | Message | Channel | Sent only if |
|---|---|---|---|
| Minutes after sign-up | Welcome, owner's name, what happens next, intake link | Email, plus a short WhatsApp | Always |
| Day 2 | Reminder: intake form, with the time it takes | Intake not received | |
| Day 4 | Book your kickoff, with the booking link | Kickoff not booked | |
| Day 7 | How is it going? Anything blocking you? | Still active | |
| Day 10 | Internal: call this customer | Slack or email to owner | Intake or kickoff still missing |
| Day 30 | First-month review and what comes next | Still active |
Rules of thumb that hold across industries:
- Every message asks for one thing. “Upload your bank statements” works. “Upload statements, book a call and read our guide” gets none of them done.
- Say how long it takes. “The form takes about ten minutes” lowers the effort barrier.
- Sign as the owner, not “the team”. People reply to a name.
- Make replying easy. A reminder that invites “reply to this message if you’re stuck” surfaces problems early.
- Match the hour to the customer. A sweep scheduled for mid-morning in the customer’s time zone beats a wait chain that fires at 2 a.m. because that’s when they paid.
For reminder wording on WhatsApp, ChatMitra’s guide to WhatsApp reminder messages has examples.
WhatsApp in onboarding: the rules that apply
WhatsApp is effective for short onboarding nudges because people see the message, but it comes with rules that email doesn’t have.
- Consent first. The customer must have agreed to receive WhatsApp messages from your business. Collect that agreement on the sign-up form or proposal, and store it in the customer record.
- Templates outside the 24-hour window. Unless the customer messaged you in the last 24 hours, you must send a pre-approved template. Plan your onboarding templates in advance and get them approved before launch.
- Category is Meta’s call. Meta’s template guidelines classify a template as utility only when it is non-promotional and specific to the customer’s account or transaction. One of Meta’s own utility examples is a message asking someone to finish setting up a profile. A welcome that includes an offer or upsell will be treated as marketing. Keep onboarding templates factual and specific, and keep promotions out of them.
- Variables are plain values. Pass the customer’s name, owner and link as separate variables rather than one long block of text.
In WorkflowMitra the WhatsApp step sends through ChatMitra, the WhatsApp Business messaging platform behind WorkflowMitra, or through Meta’s Cloud API with your own credentials. If you send through ChatMitra, customer replies arrive in your ChatMitra inbox, where the owner can answer them and update the customer’s status. You can read more about the sending side on ChatMitra.
Stop conditions and handoffs
Decide in advance when the automation goes quiet and who takes over. Write these into the sheet as status values:
| Situation | Status | What the automation does |
|---|---|---|
| Reached the first result | done | Sends nothing more |
| Asked for more time, travelling, on hold | paused | Sends nothing until set back to active |
| Cancelled, refunded or churned | cancelled | Sends nothing; optionally alerts the owner |
| Asked not to be messaged on WhatsApp | A no_whatsapp flag | Routes their reminders to email |
| Stuck at a milestone past day 10 | Stays active | Alerts the owner to call |
Two habits keep this honest. First, the sweep checks status immediately before it sends, every day, so a change takes effect by the next morning. Second, refunds and cancellations should set the status automatically where possible: a Razorpay or Stripe refund webhook can run a tiny workflow that finds the customer’s row and sets cancelled.
If a single decision needs sign-off, such as granting an onboarding extension or waiving a setup fee, the “Wait for approval” step can pause a workflow until a manager approves it in the app. Approval workflow automation explains how.
How to tell whether onboarding is working
Track a few numbers from the sheet itself:
- Time to first result. Days from
start_datetodone. This is the number onboarding exists to shrink. - Milestone completion by day. The share of customers whose intake arrived by day 2, by day 4 and by day 7. A milestone that is usually late needs a better message or a simpler task, not more reminders.
- Stuck rate. How many customers trigger the day-10 alert.
- Early cancellations. Customers who cancel within the first 30 days.
A weekly summary of these can be sent automatically with a scheduled workflow, as described in automated daily reports.
What it costs to run in WorkflowMitra
WorkflowMitra charges credits per executed step. Triggers, Sheets, email, WhatsApp, Slack and Assign steps cost one credit each; IF, Switch and Delay are free; a Code step is metered by running time and a snippet like the one above costs a small fraction of a credit; a Loop costs one credit per item.
| Workflow | Steps that cost credits | Credits |
|---|---|---|
| Welcome, per new customer | Trigger, Sheets add, Assign, Sheets update, email, WhatsApp, Slack (Code under 0.1) | About 7 |
| Daily sweep, fixed part | Schedule trigger, Sheets read (Code under 0.1) | About 2 a day |
| Daily sweep, per message sent | Loop item, the send, Sheets update | 3 |
A practice that takes on 40 customers a month, each receiving about five follow-ups, uses roughly 280 credits on welcomes, 60 on the daily sweep and 600 on follow-ups: under 1,000 credits a month. The entry plan includes 10,000 credits for ₹999 a month, and the 14-day trial needs no card. WhatsApp templates also carry Meta’s charges, plus ChatMitra’s fee if you send through ChatMitra; check ChatMitra pricing for current rates.
Rolling it out without surprising customers
- Build with your own details. Add yourself and a colleague as test customers with start dates in the past, so the sweep finds you due.
- Run the sweep manually and read the output. Check the Code step’s
duelist before any message goes out. - Pilot with the next five real customers, with owners told to watch closely.
- Review the execution history after the first week for failed steps.
- Turn on failure alerts. WorkflowMitra can email you or post to Slack when a run fails, so a broken sweep doesn’t go unnoticed for a week.
- Load existing customers last, with their real start dates and
sentvalues filled in, so they don’t receive messages meant for week one.
When something goes wrong
| Symptom | Likely cause | Fix |
|---|---|---|
| A customer got two welcome messages | Webhook retried, or two start signals | Find-then-IF before adding the row; one start signal |
| Nobody is ever due | Dates read as 12/10/2026, or status typed "Active " with a space | Check the problems output; the snippet trims and lowercases status |
| A finished customer got a reminder | Wait chain with no status check, or milestone not ticked | Add Find row + IF after each Delay; tick milestones promptly |
| Changed message isn't being sent | Customers are in waiting runs of the old version | Move long sequences to the daily sweep |
| Reminders arrive at night | Sweep scheduled in the wrong time zone | Set the trigger's time zone explicitly |
| WhatsApp send fails | Template not approved, wrong number format, or no opt-in | Digits with country code; check template status |
| Email step can't sign in | Outlook.com or Microsoft 365 mailbox | Send from Gmail, Workspace or Zoho Mail |
Common mistakes
- Building messages before mapping milestones. You end up with a newsletter, not onboarding.
- No customer record. Without one place that holds status and history, every step is guessing.
- Waiting without checking. Every reminder needs a “still relevant?” check right before it goes.
- Too many touches. If customers start muting you in week one, cut the sequence in half.
- Generic sender. A message from a named owner gets replies; “Team” gets ignored.
- No human trigger. A customer stuck for ten days needs a call, not a sixth reminder.
- Promotions in onboarding templates. They change the template’s category and dilute the one thing you asked for.
Why use WorkflowMitra for customer onboarding?
Onboarding crosses tools: a payment gateway or CRM starts it, a sheet tracks it, email and WhatsApp carry it, and the team hears about it in Slack. WorkflowMitra, powered by ChatMitra, puts that in one place:
- Start from what you already use: signed webhook presets for Razorpay, Stripe, Typeform and website forms; Google Sheets triggers that fire on one column changing; Zoho CRM via its webhooks.
- Fair owner assignment with the round-robin “Assign to the next person” step.
- Email and WhatsApp in the same workflow, with HTML email and attachments, and WhatsApp templates sent through ChatMitra or Meta’s Cloud API.
- Durable waits of up to 30 days for short sequences, and a scheduled sweep with a JavaScript Code step for longer ones.
- Failure alerts and step-by-step execution history, so a broken reminder is found quickly.
- Rupee pricing per executed step, with logic steps free.
It also has limits you should weigh. WorkflowMitra doesn’t provide in-app product tours, a client portal, document storage or e-signatures; it connects to the tools that do, where they offer webhooks or an API. Its email step can’t connect Outlook.com or Microsoft 365 mailboxes. A waiting Delay can’t be cancelled run by run, which is why this guide recommends the daily sweep for anything longer than a few days. If onboarding for you mostly happens inside your own software, a product-tour tool belongs alongside it.
Start with the first hour
You don’t need the full sequence on day one. Build Workflow 1 first: the record, the owner and the welcome. Run it for a couple of weeks, then add the sweep with just the day-2 reminder, and grow from there. You can build both on the 14-day trial with no card, and browse the templates for starting points. For other processes worth automating in a growing business, see workflow automation for small business.
Product behaviour described here, including Delay limits, version pinning of waiting runs, Loop and Code step behaviour, credit rates and plan prices, was checked in WorkflowMitra on 7 October 2026. WhatsApp template rules are from Meta's template category guidelines, read the same day. Names and figures in the examples are illustrative.
Frequently Asked Questions
Questions teams ask before they automate how new customers are welcomed and set up.
It is the use of software to run the repeatable parts of getting a new customer started: welcome messages, owner assignment, form and document reminders, kickoff scheduling nudges and check-ins. The automation reacts to a sign-up or payment, tracks where each customer is, and sends the next step only when it still applies. People still handle calls, judgement and custom setup.
Automate the work between your apps
Build workflows with triggers, conditions and actions, then test them before they go live. Try WorkflowMitra free for 14 days, no card required.